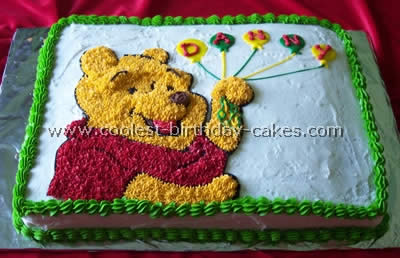
Because my son went everywhere with his Pooh Bear I picked this theme several months before he turned one years old. I searched through many books and video covers until I found a Winnie the Pooh pic that I could work with. I then practiced drawing it freehand almost daily until I felt that I had it right.
I baked a double sized cake in an 11 by 15 pan. Using dental floss I sliced through the center of the cake to make two layers filling it with homemade cream cheese filling. Once it was iced using homemade buttercream icing, I used a toothpick to draw Pooh Bear. Any mistakes were “erased” using a spatula dipped in milk. Then the outline and details were piped in using tip #2.
For coloring the icing I purchased a four pack of Wilton Pooh Bear food color gel. The nose and inside his mouth are chocolate icing. I built up his brow, bone cheeks, snout and shirt collar simply by mounding the stars atop one another. In the original picture Pooh was holding a feather (a quill pen actually). I wanted him to be holding balloons instead so I drew them on using Wilton cake-writing gels. Once dry I used red buttercream icing and tip #2 to write my son’s name. Fun was had by all and he was very excited when he saw his cake.
More Winnie the Pooh Cakes
Cake by Colleen N., Indianapolis, IN

For my son’s first birthday I wanted to make him a Winnie the Pooh cake. I had decorated his nursery with Pooh and Friends so I wanted to continue that theme for his birthday. I planned ahead and bought a Pooh cake pan (made by Wilton) before my son was even born! At first I followed the directions with the pan plus had a Winnie the Pooh pic in front of me. I only used one cake mix. However after I baked the cake I found that one cake mix wasn’t enough to fill the pan. So I decided to try again with two cake mixes. With two mixes it took much longer for the center of the cake to completely bake but the end result was that the cake filled the pan
To decorate it I made my own buttercream icing and tinted it in three colors (black, red and gold) using the Wilton Pooh icing colors. I used the black icing first to do Pooh’s nose, mouth, eyebrows etc. Second I used the red icing with a star tip to fill in Pooh’s shirt. And lastly I used the gold icing with a star tip to fill in Pooh’s face.
I was very pleased with the end result and the birthday guests were impressed! Several people even asked me where I had ordered the cake from not realizing that I had baked and decorated it myself!
Winnie the Pooh pic cake by Susan H., Sonora, CA

This was created using the Winnie the Pooh Stand-up (or 3-D) cake pan. I found it on EBay as I could not find it in stores. The cake pan came with detailed instructions and even frosting recipes etc. and I had a Winnie the Poo pic in front of me as well. If for some reason your pan doesn’t come with the instructions sheet you can find it online at Wilton’s site.
This is the second time doing a character cake but this was my first stand-up cake and thought it was easy.
Cake by Donna K., Chandler, AZ

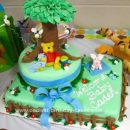
I got the idea for this cake from a Winnie the Pooh pic on this website! There is a cake pretty similar to this one that I just had to make! I used the Wilton 3D Pooh Cake pan for the Pooh bear. He is made of pound cake with buttercream frosting.
The presents are rice krispy treats covered in colored fondant and the ribbons and bows are white fondant. The bottom cake is a full sheet cake size with two 9″ x 13″ inch cakes set side by side and frosted together. The smash cakes are made using the 6″ x 2″ Wiltons round cake pans and the top layer of them is the 4″ x 1 3/4″ Wiltons mini round cake pans. I used a standard cake mix to make these.
Cake by Marylee L., Lenexa, KS

I was able to ‘rent’ the pan from a local bakery and they suggested I use 2 cake mixes which I did. However that means the center doesn’t cook all the way through so I kept putting it back in the oven and made it quite dry. What I was supposed to do was dig out the uncooked batter. To make the cake moist again I sprayed the cake with water before frosting it later. Everybody thought it turned out great!
Cake by Brandi M., Colorado Springs, CO

While I have to acknowledge that my icing job doesn’t look anywhere near the professional level that most of the cakes on this website do, I just had to send this in. I’ve never done anything like this before. This was for my son’s first birthday. He loves to watch the scene of “The Adventures of Winnie the Pooh” where Pooh is floating up the honey tree. He laughs and laughs at the bees chasing Pooh Bear. I had to commemorate it!
I found the graphic online and his daddy blew it up for me into a Winnie the Pooh pic. I made a 13 x 18 white chocolate cake for the sky and an 11 x 17 Hershey’s Cocoa chocolate cake (the recipe is on the back of the box). I then cut around the blown up Winnie the Pooh pic and cut out two bumble bees freehand. The balloon was made in an 8 in. round cake pan…also Hershey’s Cocoa.
I made a buttercream frosting and used Wilton icing colors. Like I said this is my first attempt at such a project so my icing job wasn’t perfect but it sure was fun and it tasted delicious. I followed advice that I found on this website for using a pairing knife to write the words and then traced over it with icing. My son loved it!
Cake by Steve S., Ontario, Canada

This is my first cake I made after one Wilton Level 1 class. I created layout in Corel Draw and mirrored design and traced it out on wax paper with black gel. I then rubbed gel onto top of 9″ round cake. When wax paper is lifted off the design is left on the iced cake. I then traced around the gel with black icing to do all the outlines. Then I filled with red and Pooh orange colors. Did the border with star tip and made flower shapes around the sides of the cake.
When I completed the cake I checked out a Winnie the Pooh pic and I was very close with my creation!
Cake by Melissa T., Athens, OH

I saw this Winnie the Pooh pic from a student who works for me of her cousins birthday party. I knew I had to have it and the search was on. It took me a while to find the pan since it was retired from Wilton. Ebay came to the rescue.
They were selling at very high prices I finally got lucky and won a bid. I never did a pretest I just went with it. It was actually much easier then I thought. I baked the cake the day or two before the party. That morning I started icing. Creating the colors was the hardest. Wilton has Pooh colors already done but I could not find them within a 2 hour radius. Once I started icing the cake it went pretty quick. I did however have to put the icing in the freezer every so often because it was getting too soft. I was very surprised how good it turned out this was the first time I hard ever done anything like this. I can’t wait for her 2nd Birthday!


I made this cake from a Winnie the Pooh pic for a client that wanted a Winnie the Pooh themed cake but kept very simple.
The inspiration came from a cake I saw that had a Teddy Bear on top of it.
The cake is almond with fresh strawberry filling and iced in butter cream.
All the decorative work is made from fondant including Winnie the Pooh.


I designed this for a friends baby shower from a Winnie the Pooh pic. I used the invite for inspiration!!! For bows roll fondant thin then place a wad of tissue (paper towel or toilet) in the center of the folded ribbon. I have sent the pattern for the Pooh.
I used melted white chocolate on wax paper then hand painted them with edible dusts and outlined with some thinned gel. Color the balloon with a tear drop shaped piece of marshmallow fondant and was also hand painted with edible dust and gel color.
Cake by Karlene D., Angola, IN

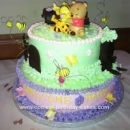
I did a Winnie the Pooh themed party for my daughter’s one-year birthday. I made the small bear mold and decorated it with butter cream icing using the colors you see for her own cake. Then I also did a beehive for the adults using the half-dome cake pan. I decorated it with yellow icing and some bees from black icing with white for wings.

I didn’t get a picture of both cakes unfortunately. But here is the Winnie the Pooh pic that’ll hopefully give you inspiration.
Cake by Valerie G., Quebec, Canada

Funny history here: my client ordered a 3D sitting Winnie cake. When I got to un-mold the cake, it was still too hot so the legs cracked and fell apart… I called my client and made an agreement with a new idea: instead of Winnie holding his honey pot, why not putting him INTO his honey pot! :-) So as you can see in my Winnie the Pooh pic, I cut the bottom part of the body and baked 2 round cakes and iced them with blue icing for the honey pot!
Your comment has been sent successfully.