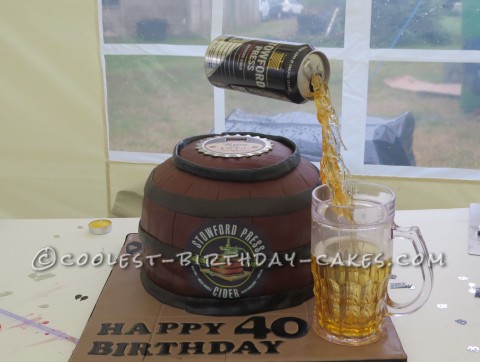
I made this anti gravity cake for my son-in-law who loves Stowford Cider. It was for his 40th birthday and I wanted something with a WOW factor.
Designing the Barrel Cake
The cake was made from a 6 layer checkered cake using a Zenker 24cm set of 3 checkered cake tins (which I bought for £2 from a local car boot sale). The cake flavour was Chocolate and vanilla sponge which I layered together with homemade strawberry jam and alternate layers of chocolate or vanilla buttercream. Once assembled I carved the top of the barrel and shaped it to form half a barrel. I then crumb coated it with chocolate buttercream and put it in fridge for an hour to firm.
Once firm I covered the barrel with Renshaw chocolate flavoured fondant which I had rolled out with a wood textured rolling pin. I then scored lines down the barrel sides to form planks of wood. To create the metal bands that hold a barrel together I used strips of black fondant.
On top of the barrel is a metal magnetic bottle opener with Ryan and year of birth printed on it. The label on the front of barrel is my son-in-laws favourite cider so I had this printed onto rice paper.
Creating the Anti Gravity Cider Pour
The beer glass is made of plastic. It is one that you can put in the freezer and then use to cool the drink. I bought it at a local Home Bargain store.
I had seen numerous gravity cakes online but disliked the liquid effect as people had used fondant and I felt that this looked too artificial. I experimented with various things (ie. piping gel, royal icing and melted toffee), but they all looked too heavy. Suddenly, I had a brainwave to try melting clear mints. To do that I placed them in a glass dish and microwaved them for 10 seconds at a time, stirring in between each 10 seconds until they were melted.
- IMPORTANT: At this point you have to work quickly, so have a piece of greaseproof paper on a tray, a clear straw with a bendy end and some Ivory colouring gel.
When the mints are completely melted, add a tiny spot of Ivory colouring gel and stir. Pour onto greaseproof paper, place the straw on top and quickly roll the straw in the liquid mix keeping the bendy end of straw free. Once straw is covered push the free end into a piece of polystyrene and using a paint brush apply the remaining mint mix to the straw, pulling the brush away to create splashes. Then, leave it to dry.
To attach the straw to the glass and can I melted some more mints and put a blob on the bottom and side of glass and attached the straw. Then I put a blob on the bendy end of straw and pushed it into the can.
To complete the look I covered the cake board with fondant and scored squares to make it look like a cellar floor.
I love this cake. To me it looks so real and everyone else thought so too. I had so many compliments which was lovely.

Wonderful effect! Thank you for the explanation to get the clear ‘liquid’ that allows the can to float. This is the most realistic one I’ve ever seen!
Wonderful effect! Thank you for the explanation to get the clear ‘liquid’ that allows the can to float. This is the most realistic one I’ve ever seen!