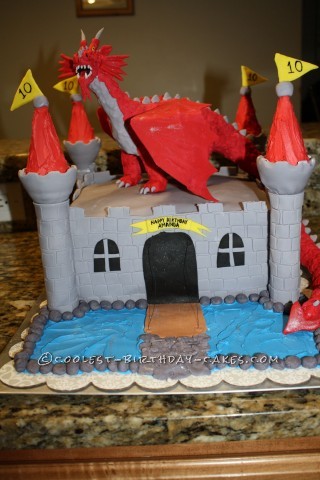
I made this dragon and castle cake for my daughter’s 10th birthday. I had started the tradition of making my kid’s birthday cakes because my Mom used to do the same. My daughter has been into dragons and wanted another dragon cake. However, I like to do different cakes so I recommended a castle cake with a dragon protecting it. She loved the idea.
At her party the kids and parents were amazed by the dragon and castle cake. They were even more amazed that I had made it. Parents were taking pictures to send to family and friends because they were so impressed. They said that they had never seen a cake like that in person. The look on my daughter’s face was priceless, she told me it was better than she ever imagined. I make the best cakes ever and that we need to open a family cake business. You could see how proud she was to tell her friends that her Mom made her cake. And she even helped! That’s what makes 15 hours of late night cake constructing worth EVERY minute.
With a 5 day work week ahead of me, I baked the cake the weekend before the party. Using a square cake pan, I dirty-iced 3 layers of funfetti cake together and then froze it. I find that freezing the cake helps to keep it moist. I do this often because of time restriction also.
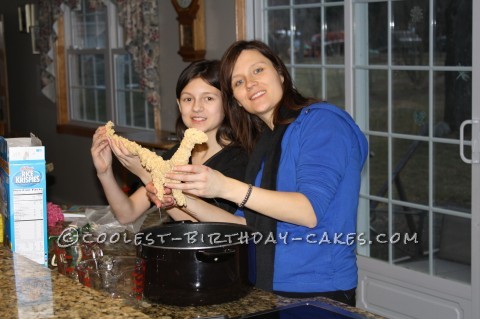
My daughter whom has now taken an interest in cake decorating helped me in making the dragon. I had her make homemade rice krispie treats and while they were warm we pressed them onto wire that I constructed into a dragon shape. This is the first time I’ve ever used rice krispie treats to construct something. I must say it was quite challenging to get them off of your hands. We tried holding wax paper but that was more difficult. Needless to say we had a lot of laughs as we were working together in the sticky situation. When the rice krispie dragon was done (It looked like a brontosaurus) I turned a glass upside down to store it on and covered it with wax paper.
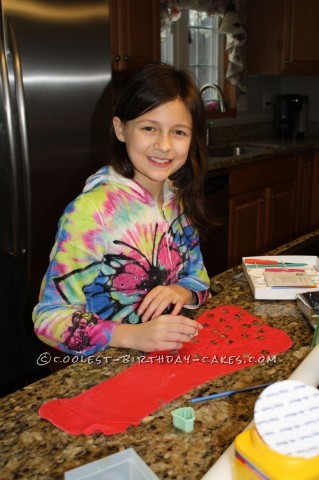
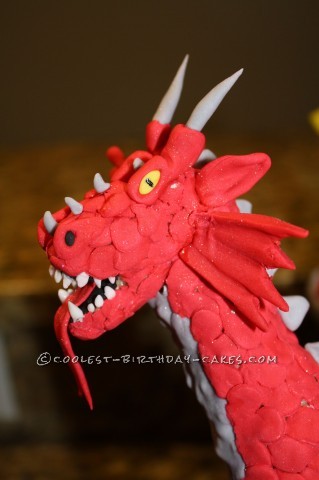
Wednesday night was operation dragon decorating. We started by rolling out red fondant. My daughter used two different sizes of flower cutters to make the scales. As she was cutting the flower shapes, I began to place them on the rice krispie dragon. I started from the tail moving upward towards the body. I ripped the petals off and layered them one by one. Once the scales were complete, I began adding the details. I made the teeth and claws by just rolling fondant in my hand in order to make them small enough. The eyes were yellow with a small dot of black food coloring for the eye. Six hours later my dragon was complete. As for me…completely exhausted, yet I couldn’t fall asleep because I was so excited about the outcome of this creature that I created.
Thursday night was operation castle decorating and cake completion. My husband took the cake out of the freezer that afternoon so I could begin covering it when I got home. In my experiences I’ve found that if you cover the cake when it is cold the fondant gets very sticky. We colored the fondant grey for the castle, I covered the top first, using a ruler to measure and cut the fondant to size. I then did each side individually the same way but used a small square cutter to imprint the fondant so it looked like bricks. I then covered four plastic towers from a castle kit with the fondant.
For the cones on top of the towers covered them with red icing and adhered them to the tower with icing. I used icing on each corner of the cake to adhere the towers to it. I made a drawbridge and used blue icing for the water that surrounded the castle. My daughter and son rolled fondant into balls for the stones and we surrounded the bottom of the castle with them to make it look more complete. I added some windows that I cut out using a paper template that I made and added bars on them.
Next I placed the dragon on the top. I had left the wires long so they came through the bottom of the feet so I could stick the dragon into the cake and not worry about it falling over because of the size. The tail fell off the side of the castle perfectly and it was just the right length.
Now was the hard part of adding the wings. I made a template out of paper and cut the wings out of fondant. I allowed them to hang off the counter slightly and harden so they appeared bent. Then, I used a very thin piece of wire that stuck into the dragon and the cake to place the wing on. I adhered the wing to the wire using the red fondant and I couldn’t believe how perfectly it worked. Then I added flags made out of fondant to the tops of the towers with toothpicks and in black food coloring put the number 10 on them. To finish it off I put a banner above the door and in food coloring wrote HAPPY BIRTHDAY AMANDA and added edible silver shimmer to the whole cake.
At her party the kids and parents were amazed by the dragon and castle cake. They were even more amazed that I had made it. Parents were taking pictures to send to family and friends because they were so impressed and had never seen a cake like that in person. The look on my daughter’s face was priceless, she told me it was better than she ever imagined, I make the best cakes ever and that we need to open a family cake business. You could see how proud she was to tell her friends that her Mom made her dragon and castle cake and she even helped. That’s what makes 15 hours of late night cake constructing worth EVERY minute.

Awesome cake, with lots of great detail!
Awesome cake, with lots of great detail!