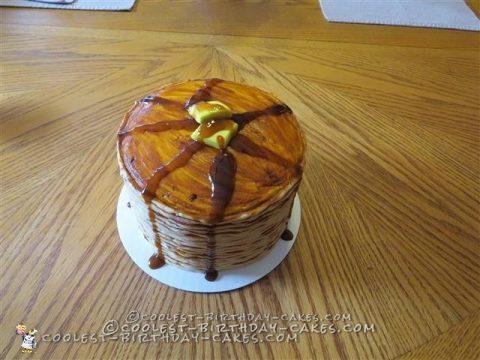
This pancake birthday cake was actually for my birthday this year!
Pancake Birthday Cake Instructions
- I used Wiltons 5 baking pan set and made a coconut cake.
- I then made a coconut cream filling to go in between the layers.
- Once they were ready I started stacking and filling till it was done and then I put a crumb coat on it and popped it in the fridge for 2 hours.
- I put a nice layer of buttercream icing on top and did a lighter coat on the sides.
- Then, I let it harden up a little and smoothed it over with a small rolling pan.
- Next, I took some buttercream icing and tinted a tan color for the sides of the cake and put it in a bag with a number 12 tip.
- I also got yellow and brown airbrush colors mixed a little bit together till I got the color I wanted and then I began using a paint brush and painting the top of the cake.
- After that was done I took my bag and started at the bottom and went around the whole cake with the #12 tip.
- I then took the yellow/brown airbrush mix and painted the top of the row I just did.
- I kept repeating that action until I reached the top.
TIP: Remember when you are going around the cake not to go perfectly straight. I would weave a little bit to add character, as well for the painting part.
- Once I was done with the sides, I went back and touched up the top of the cake to get a little darker and I went all around the edges of the cake to see if it needed any spots touched up.
- I then mixed up some yellow fondant and cut it into 2 squares. The butter was the only thing made out of fondant. Everything else was made out of icing!
- I placed the butter on top.
- I then made up piping gel and added some brown to it to tint it to look like syrup.
- I used a spoon to drizzle it over the cake and let it drop down the sides of the cake.
