My sister called me to make a cake for her boyfriend’s birthday because he loves the way I prepare the cake even though it’s box mix! The trick is to cook it the minimum amount of time required to make sure it is good and moist.
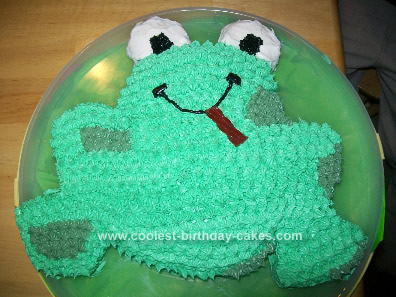
To start this Froggy Birthday Cake I used two boxes of French vanilla cake mix. I wanted to have extra cake just for if I made a mistake. I prepared the body in a large Pyrex bowl. I only filled it about 1/3 of the way. I cut off a small part from the body to make the top flat for the head to attach and it ended up fitting perfected for the mouth.
For the head I made a small circle with a regular round baking pan and only filled it 1/4 of the way. Once it was cool I cut it in half and put half on the top. I put the body under it and used a butter knife to shape the eyes. For the legs I made a square with a brownie pan. I didn’t end up using very much of this. I kept cutting out templates for the legs and putting them next to the body until I found what would fit. Then I used them over the cake to help me cut the legs our perfectly.
Once all the pieces were attached I used the knife to make any finishing touches. Then I used green and yellow food coloring to dye vanilla frosting. Keep a little frosting white for the eyes! I frosted the entire cake with the green, but the eyes. Then, I used the frosting in a bag with the star tip and put stars all over except a couple places where I marked off spots (I wish I made more spots on him!).
When I was done with the first color I added more food coloring to the bag and made the spots. Then I carefully frosted the white eyes and used the star tip with black icing to make the black in his eyes and the thin tip for his mouth. Then I cut a piece of Twizzler for his tongue. The extra mix went into making cupcakes that I thought she could give out as lily pads at his birthday party. I think the best thing that I did while making this cake was to draw a picture of how I wanted it to look and where each cake was going to fit before I started cutting any cake!







Your comment has been sent successfully.