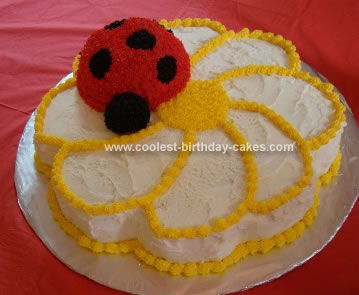
I wanted to make a homemade cake for my daughter’s ladybug-themed second birthday party, however I didn’t want to do one big ladybug because I knew it would require so much red frosting (and red frosting and two-year-old’s are not a good match). So I decided to make a large daisy cake with a ladybug accent.
I used a 16-in (x 2″ deep) round cake pan for this Ladybug Daisy Birthday Cake, and I baked two layers. I used the following recipe, which is from the Magnolia Bakery:
Cake Batter:
1 cup unsalted butter, softened
2 cups sugar
4 large eggs, at room temperature
1 1/2 cups self rising flour
1 1/4 cups all-purpose flour
1 cup milk
1 teaspoon vanilla
(I also used a touch of almond extract, because I like the flavor.)
Directions:
1. In a large bowl, on the medium speed of an electric mixer, cream the butter until smooth.
2. Add the sugar gradually and beat until fluffy, about 3 minutes.
3. Add the eggs one at a time, beating well after each addition.
4. Combine the flours and add in four parts, alternating with the milk and the vanilla extract, beating well after each addition.
Due to the size of the cake I was baking, I used 1 1/2 times the recipe for each layer, reserving some for the ladybug portion. I baked each layer at 325 degrees for about 40 minutes. Again, due to the size, I used a Wilton baking core for even baking. I used Pam Baking spray, which worked beautifully–no sticking at all. The ladybug portion was baked in a 6″ Pyrex glass bowl.
The tricky part was stacking the two 16″ layers. Once stacked, I cut the edges into scalloped petals. I used some of these cutaway crumbs, mixed them with frosting, and formed them into a ball to create the ladybug’s head (see Bakerella’s Cake Ball recipe for details). I frosted the cake with Wilton’s Buttercream Frosting recipe, which sets up nicely and works well for decorating, plus it tastes great. I placed the ladybug on the daisy cake, then used a star tip and red frosting (LOTS of Wilton red gel coloring required!) to frost the ladybug. For the black spots and ladybug’s head, I used a store-bought tube of black decorator frosting (tube came with it’s own star tip), since I knew I wouldn’t need much.
I was pleased with the outcome of this cake. It looked great, and everyone raved about the taste!

Your comment has been sent successfully.