I made a Chili Pepper cake for my step-mom’s surprise 35th Birthday! I used two cake mixes. First I baked a cake (dyed green) in a jelly roll pan; I baked the second cake (dyed red) in another jelly roll pan (About 15 minutes for each on 350 degrees). I put them both DIRECTLY into the freezer after taking them out of the oven—this locks in moisture.
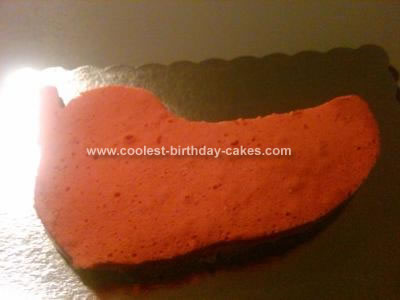
Once completely cooled, I cut out the shape of the chili pepper on each pan and placed it onto a cake board ($1.99 at Michael’s Craft Store). The green layer on the bottom, I spread butter cream on top and stacked the red layer on top (once cut, it looks like the Mexican flag!! Green, white and red!)
Next, I trimmed the edges to make sure the two layers matched up and then frosted the entire cake, top and sides with white butter cream. The frosting needs to be extremely soft. Cake mixes are very fragile and spongy, and will easily tear the cake. BUT, remember, you’re covering the cake with colored sugar!! You won’t even see any mistakes if you make one or two.
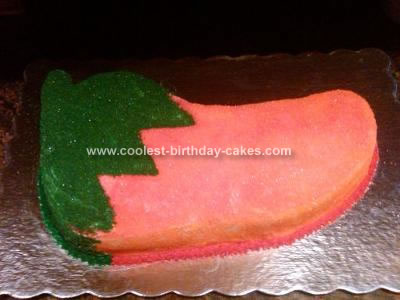
Next, I put down a template for the stem and top of the pepper—I simply cut wax paper into a triangle pattern and placed it onto the cake– making sure it was securely stuck to the frosting to ensure precise lines. While the frosting is still wet, I sprinkled red and orange sugar on the pepper portion of the cake and then removed the wax paper to sprinkle green sugar onto the step and top. Finally, I piped stars around the base of the pepper (green and red). It was a big hit, fed 20 people.
COST BREAKDOWN: 2 cake mixes, $2 for both, 6 Eggs total, $1, 2/3 cup veg oil ($.50) and 2 cups of water. Icing cost $7 to make, (buttercream recipe) Sugar was $3 for 3 colors) dye for the cakes was $4 total, and the cake board was $2). TOTAL for this cake, less than $20.



Was the coolest cake ever…..also tasted amazing!!!!