I used butter cream for all frosting on this South Park cake. I used Wilton and Satin Ice fondant since that is what I had. The cake needs to be very dense. I used a box mix – Duncan Heinz red velvet. A pound cake will work nice too.
The bottom 2 tiers are 15″ and 12″ hexagons. I also added extra cake for the hills. Once these 2 cakes were filled and iced I put in dowel rod supports for Cartman. I used 5 – like the pattern on a dice – and then used a square 6″ plastic cake plate.
I drilled a hole in the center of the cake plate for a dowel rod that went through the bottom tiers and up through Cartman. For the Cartman body I baked the cake in a 6 cup pampered chef batter bowl. You could also use the Wilton doll wonder mold. I leveled the bottom edge with a knife – this is the bottom of the shirt.
I baked the head using the Wilton sports ball pan. The head bakes in two halves. I made a round 6″ cake, leveled off the top and then cut again to make a 1 inch round cake. I cut out the shape of the feet.
After you have built the bottom and have the cake plate and dowel rods in place, put on the feet, then the body and frost with butter cream. I cut a small circle out of card board, poked a hole in the center and added this to the top of the cake for the head to rest on so it would not go into the body of the cake. Then I added each half of the ball to make the sphere shape of the head. Then frosted the head.
I froze my cakes before assembling them. Some bakers would disagree on doing this but it really helps me get the cake together and the butter cream on without crumb. The finished height of this cake was almost 15″. I was lucky to have enough space in my my fridge.
I added extra dowels in the head to keep the 2 halves together. Due to settling and the car ride to the restaurant these rods started to push on the fondant. If you look close enough at the hat you may see. I was able to fix this on the spot.
If I join fondant parts together I use a small paint brush and any clear alcohol. The higher the proof the better for faster drying. If I say glue, I mean this and not actual glue.
I use the small Wilton fondant rolling pin for the little stuff. It comes with rings to put on the ends to keep the thickness all the same and it comes with 3 different depths to help you pick the right thickness.
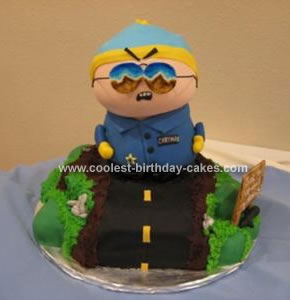
I rolled out the black fondant for the street first. It has 2 parts, one in front of the feet and one behind. I cut the width first and added the strip to the cake cutting off the excess length at the base of the cake. I added the yellow stripes next made of yellow fondant. I also cut black for the shoes making the seam between the shoes to hide it. Later I painted the shoes with black color gel and a little bit of vodka to make them shine. Only the toes and heels of the shoes were black. i made the sides brown to look like his pants. You can’t see that in the head on photo but I can share with you a side photo.
Next I covered the grass. I didn’t cover all the grass in fondant I rolled out patches and covered some in fondant and the other parts I piped with the grass tip. There was no way to cover all the grass with fondant without seams so using both helps make it easier and adds more dimension to the look of the cake. I also like using multiple colors of green to make it more interesting. I separated the black road and green grass with chocolate frosting to help make the shoulder of the road. Since it was a groom’s cake I did not add any flowers but made fondant rocks instead. (More manly.) For the rocks I started with white fondant, added a tiny bit of black gel and pulled it like pulling taffy. If you pull it just enough to make streaks and gray then it’s great. If you over pull you’ll end up with just gray or black. I also crushed Oreo cookies to make black road dirt and added it to the road and sides of the road to dirty it up a bit.
Next I added the peach for the face. I used my metal ball pan to help determine if i made the piece big enough to cover the face. It takes a large piece. I only covered the face and neck. I didn’t want to make the head heavier than it already was so under the blue hat is cake, not peach fondant. Also, the covering the neck with the peach and adding the blue shirt collar helped with keeping the head stable. Next I rolled out the blue hat. This was a big piece and was tricky to get the shape cut just right. I added it to the cake and cut off the excess. The Yellow band hides the joint between the peach and the blue. For the ball on top of the hat I rolled out a yellow ball and cut it multiple times with just the tip of a pair of scissors.
The shirt is a large piece too. I measured around the cake with a string to make sure I rolled out enough. This was the hardest part. The seam is in the front where the shirt buttons – lucky break. :) Then I added the collar, buttons, name tag and badge. I piped the name on after I put it on the shirt. The arms and mittens I hand molded. They have a toothpick in them to keep the arm and mitten together. I did glue them together but need the extra support. I tried to make them a light as possible. They are only attached to the shirt with glue. I did not want toothpicks to rip the shirt. They did slide on me a little but not much. I added the black gun pockets to his back hip and put his billy club next to the sign the groom requested. I watched Cop Cartman on the Chicken Lover episode of South Park on the internet so I could get all the details just right. I had to leave the sound off…not appropriate for my 3 yr old. :)
The face: The eye brows and mouth I just cut and glued on. The sunglasses are another story. MAKE THESE FIRST so they have time to dry. I used a very stiff green floral wire and bent the ends in a half circle with pliers for the ear piece. Then bent them again at the sides. The wire goes straight across the back of the white lenses. I cut the white lenses out of gum paste only – no fondant. I let them dry out. Then I painted on the mountains and sky with color gel and vodka. Let them dry some more. Then I attached them to the wire with a slurry of gum paste and vodka – felt like peanut butter. Then I added a little piece of wire for the bridge of the nose. Let them dry again. I added the oval shapes for the eyes on the cake. Then added the sunglasses to the face with the gum paste slurry. The wires hugged the face only slightly.
If you have any little rips to fix I have found that rubbing a little bit of vegetable shortening over it will repair it.
Well, I think that covers it. I am not an expert cake decorator….just having fun. I didn’t go to school for this so I am sure there are better ways.


omg this is amazing i love it i wish i so could do this but i cant but i love that cake