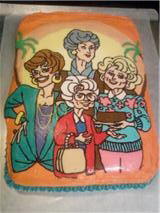
This Homemade Golden Girls Cake is a cake I made for one of my friend’s birthday party. It’s a 9×13 chocolate cake decorated with buttercream icing (Wilton’s recipe).
The method I used to decorate was a buttercream transfer. To do that, I drew out the picture I wanted, taped it onto the back of a cookie sheet for a flat surface. Then I covered the picture with saran wrap in one complete sheet and taped that down, tightly and without wrinkles. Using a #2 tip from Wilton, I piped a black frosting outline for most of the details. Placed the cookie sheet in the freezer to help the frosting set up faster. For the other colored frosting I mixed them with a little bit of light corn syrup so that when I piped them in they went in smoothly and without the piping lines. With each color addition I would use the freezer trick before adding a second color layer on top…for the final layer I spread some of the cake background frosting on the entire picture to make a solid sheet of frosting.
Put in the freezer one last time until frozen solid, then untaped the plastic wrap from the cookie sheet and turned it over onto the frosted 9×13 cake, smoothed out the edges, piped some stars around the bottom edge of the cake and was finished. *Remember when doing a buttercream transfer, that outlines and small details are to be done first before adding main frosting parts as you are working almost backwards of the picture.




Aww, I love your cake very nice design and great technique. My Mom loved the golden girls, she would have loved this for her birthday cake. I think I will save this for her 60th. Thanks for sharing and keep up the good work :)
This cake is amazing!! My 36th birthday is coming up in May….I would love this cake!!! Great Job!
Thanks for the great comments! This cake was a lot of fun to do.