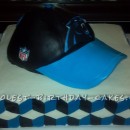
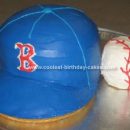
This Baseball Cap cake is the cake I ended up with after a crazy, collapsing disaster of a cake to start with. At the last minute, one of my good friends needed a cake for her father’s surprise 74th birthday party. She had lots of people coming and forgot to place an order for a cake. The night before the party she told me she was just going to grab some cupcakes from a box store. I knew she had wanted a special cake and I already had another cake in the oven, so I told her I’d make something for her. She came up with a baseball cap theme and wanted 3 caps stacked on top of each other.
Well, I baked the cakes, stacked them, and carved them, but it wasn’t working out to be anything near what I wanted. With only 2 hours until I needed to deliver a cake, I started over and baked new cakes. I made my butter cream frosting and proceeded to stack and frost 2 8″ layers. With the first tier out of the way, I got out a cake board and placed a 6″ cake on it, sliced off the top to make it level, iced it, then stacked another on top of it. I carved it just a little to make it more cap shaped, then finished icing with butter cream. I rolled out some white fondant and covered the 6″ cake tier, smoothed it out, and trimmed the bottom.
With a wheel tool I scored the fondant to look like seams and used the quilting tool to make the stitches along the sides of the seams. I colored a fondant/gum paste mix blue. I rolled out the fondant combo for the brim of the hat and used the quilting tool to make stitches along the front edge. I rolled a little into a ball to place on the top of the cap. I colored more fondant red to use for the snaps on the back of the cap and for the name badge on the front.
For the snaps on the back, I rolled out the fondant and cut it the right shape. In order to get the holes and tabs, I used two icing tips. One a little larger for the holes and one a little smaller for the tabs. I attached them all using a brush and water. After I placed the top tier on the bottom tier and added a shell border around the bottoms, I attached the brim of the hat with water. I placed a log of blue fondant wrapped around a dowel rod underneath the brim and pushed the dowel into the cake to help hold it on the cake. The cap looked too plain with the white fondant, so I tinted a little water blue with paste coloring and used a paint brush to color the cap a pale blue.
I used a paper towel to dab the colored water after I painted it on to get the result I was looking for. I cut out an oval of red fondant and placed it on the cake with water. Then I piped the name “John” onto the red oval with blue butter cream frosting. I was very shocked to be able to pull off this cake after the disaster of the first cake crumbling under the weight of itself and eventually tipping over, but I was pleased with the final result. Everyone is still talking about this cake, even though it’s been a couple of weeks since the party! Thankfully my disaster had a happy ending.

