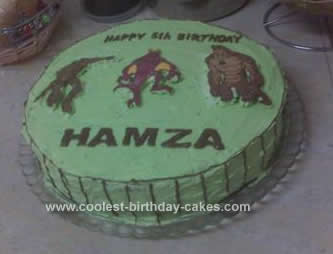
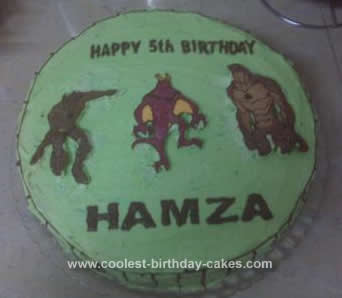
This Homemade Ben10 Cake is my very first time at decorating a fancy birthday cake! And I’ll be honest I’d been researching on what cake types to use and what icing type to use for months before hand on various internet sites. Finally, I got round to settling for what eventually turned out to be a success for my little boy who is a big Ben10 fan! My icing and cake decorating idea would work very well for those who are new at this and also don’t have the right icing tools. You will find how your regular, everyday kitchen tools can work wonders!
My sister baked me an 11 inch diameter, chocolate sponge cake. After trimming the top a little to make it flat, I slit the cake in half in the middle and turned each side on to its own plate (the bottom half must be on the serving plate or cake board that you’ll be serving on). I then took 2 full glasses of clean drinking water and added 2 tablespoons of sugar into each and stirred until the sugar was dissolved. I sprinkled the water over the cakes all over to soak the sponge so that my cake would not be dry. I used both glasses of water for both cake halves (one for each).
Then I made up some butter icing. Now, because this was my first time, I ended up making a whole lot more icing than I really needed so I suggest that if anyone uses my method, they stick to the recipe below and don’t increase it unless their cake is much bigger than my cake. Anyway, so my butter icing recipe includes 1 cup of vegetable shortening, 4 cups of icing sugar (confectioner’s sugar), 1 teaspoon plus, of vanilla essence and I used estimated milk to mix it all up. This I did using a standard cake mixer. The thing I liked about using only shortening was that the icing didn’t have that very rich taste which most butter icings have that make you feel sick after having just 2 pieces of cake. But the downside to this was that my icing became abit stiff after I’d finished and had let the cake sit for about 2 hours. So if you want your icing not to be too stiff eventually, then I suggest you use ½ cup shortening and ½ cup unsalted butter instead of 1 cup of shortening alone.
After the icing was all mixed and to the consistency that I wanted, I took several little portions of it, about a tablespoon each, and colored using standard powder food coloring to get the shades that I wanted. (A tip before I go on – do not color your icing to the exact shade you want, leave it lighter because as it sits, the color will deepen on its own. Colors such as red leave an unpleasant taste in your icing so try to use as little as possible or go for a no-taste red version available from Wilton icing colors. I couldn’t reach a black color at all since I couldn’t find black food color and so I used cocoa powder and very, very little brown food color to reach the darkest shade possible. It wasn’t black but was good enough). Now comes the fun part!
I had already printed the images I wanted from the internet and in the exact size that I wanted to appear on the cake (a tip before I go on – print your images in reverse). My son wanted the Ben 10 aliens, Alien X, Jet Ray and Humangasour to appear on his cake. I taped the printout onto a hard board and then taped waxed tracing paper onto the printout. I didn’t have any piping bags (since as I mentioned, this was my first time doing this) so I took a small clear plastic sheet and rolled it up into a cone shape with a very, very small opening in the front. I taped the cone so that it wouldn’t unroll but left the top open. I then took a full bar of milk chocolate and grated it using the handy kitchen grater so that it looked like coarse bread crumbs. I put this chocolate into a plastic bag and knotted it tight. I then heated, not boiled, some water to a temperature that was hot enough for me to stand my finger in without scalding it. I placed the chocolate bag in it for a while. I had to change the water and add some new one because it cooled off quickly. After the chocolate was completely melted, which I helped further by rubbing the chocolate bag between my hands, I cut the top off (where it was knotted) and transferred the chocolate into the cone that I’d made. I then closed the cone at the top by rolling the plastic a little and then taping it up. Then I snipped the point off to the size I wanted which was almost the size of the writing tip of a piping bag. I used this chocolate cone to make the outline on my images (a few tips before I go on – you can melt your chocolate in a glass bowl over hot water if you find that easier. Just be careful not to let any water get into it, or not to overheat the chocolate, or else it’ll lose temper and be too soft to work with after you’re through).
Once the outlines were made, I filled in the colored icing using the back of a small plastic spoon and smoothened it properly so that no gaps were left using the same spoon where the areas were large and a toothpick where the areas were small. After I was through coloring the images, I used the same background color that was going to be on my cake and covered the colored images using this again. This was to support my different colors on the images (a tip before I go on – don’t make this support too thick. Smoothen it out well so that it’s the same size as your image but be careful not to press to hard and end up disturbing the different colors underneath). I then untaped the waxed paper and put it in the deep freezer so that my butter cream would freeze.
Next I took the same chocolate cone to outline the “Happy 5th Birthday” as well as my son’s name which were part of my printout, and made on Word Art. I did this on waxed paper taped onto the print out. The chocolate had hardened a little but I popped the cone in the microwave for about 30 seconds (avoid doing this too much though as the plastic will start releasing harmful chemicals into your chocolate – once is more than enough). I outlined each letter and the number and then filled it in properly with the chocolate. I then untaped the waxed paper and put it in the deep freezer as well.
Next came icing the cake. I sandwiched the cake halves using the same butter cream that would go on top of my cake as the background color. This was soft green. I iced the cake completely using a spatula, on top and all around. After this was done, I removed my frozen images and turned each upside down on to the cake on the exact spot that I wanted it to be. Next I removed the writing and carefully lifted each letter using a thin blade kitchen knife and placing on my cake. Once I was done, I used the remaining chocolate in my cone to pipe a thin outline around the cake as a border and drew lines from it at intervals coming down. I did this just to give the cake more beauty and also to use up my remaining chocolate. And voila! There was my piece of art that I worked on for a good 3 hours! I know that it doesn’t look like much but it was my very first attempt and my son loved it! That’s all that mattered.


The homemade birthday cake ever.Just so wonderful
aliya i must say that for a first time you did a fabulous job! the cake looks so beautiful. thanks for all the tips. will definately try it out!