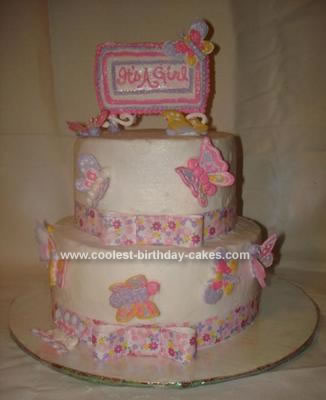
I started off by making (2)8″ cakes and (2)6″ cakes (you can make whatever sizes you prefer). I stacked and iced them in white buttercream. I then placed a flowered ribbon around the bottom edge of each cake (you can of course use whatever ribbon you’d like. A good tip to remember is that when you use ribbon, place a strip of masking tape to the back of it before you place it on your cake so that the shortening in your buttercream doesn’t seep through and discolor your ribbon).
On to the butterflies and the topper of the Butterfly Baby Shower Cake. I made a batch of royal icing and colored it to the desired colors. I went through a coloring book that was lying around and found a few butterfly pictures that were cute. I placed the butterfly pictures under a sheet of parchment/waxed paper and outlined and filled in the butterflies wings with royal icing. You want to make the wings by themselves and let them dry flat. After the wings are dry (about 24 hours), take some royal icing and make a body and place the wings into the body and then let those dry. You may need to prop the wings up with something. Times vary on the drying times. You may want to make extra’s just in case of breakage.
After the butterflies are done, attach them to your cake with a dot of royal icing. The topper was made with royal icing. I used a little template I made on my computer, but you can freehand the topper pattern if you would like to. After the topper sign is dry, flip it over and place a line of icing onto each side and place a skewer into the icing let it dry and your topper will be done. Place that into your cake and there you have a precious little butterfly cake.
Happy Baking!
Your comment has been sent successfully.