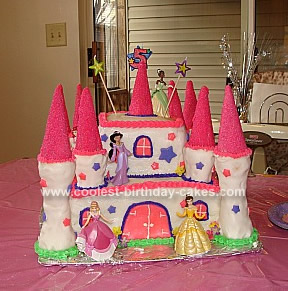
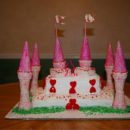
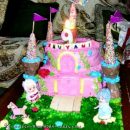
I made this Castle Cake Design for my daughter Alexis for her 5th birthday. I did lots of research on this website actually, to get an idea of how to do the cake and different ideas on colors and shapes. I decided to do a square castle. I used a large 10 inch square cake pan to do the bottom two layers of cake, and then used a 6 inch square cake pan to do the top two layers. I made all the cakes the day before my daughter’s birthday to make sure they were fully cooled and ready.
To ice this cake I used both butter cream icing and then a layer of fondant. I made about 9 cups worth of butter cream icing. With the fondant, I found a recipe on allrecipes.com for a butter cream fondant. I did a double batch of the fondant. I had never used fondant before, so I really wasn’t sure what to expect. That particular recipe I felt was too greasy and I did have issues with it cracking apart. I thought it had a great taste though, and all in all it ended up getting the job done. I made the stars, doors, and windows all out of the fondant. I just added some Wilton coloring to it, rolled it out and cut out the stars with fondant cutters, and used a butter knife to cut out the doors and windows. I made both the fondant and the butter cream a few days before my daughter’s birthday and put it in a sealed container in the refrigerator. When I was ready to use the butter cream, all I had to do was re-whip it back up. Made things go much smoother the day I had to put everything together.
For the pillars, I just used regular ice cream cones. And for the points on top of the pillars I used sugar cones. I bought some pink candy coating from Michaels and pink sprinkles. I melted the candy coating, and rolled the sugar cones in it. Then I rolled the sugar cones in some of the pink sprinkles and let the cones dry. Make sure when rolling it in the candy coating that you let the excess drip off or else when you roll it in the sprinkles, it will all just start sliding off. I did these cones a couple days before my daughter’s birthday also.
They day of my daughter’s birthday, I did all the decorating and icing of the cake. I started with the bottom layer of cake and completely iced that with the white butter cream icing. Then I placed the next layer on top of the bottom layer. I iced that as well. After I completed icing the bottom two layers, I rolled out some of my fondant and put it over them. I smoothed it out with a fondant smoother. I then put a smaller square layer of butter cream on the top of those cakes so that I could place one of the 6 inch cakes on there. I placed the next cake on, iced, and then did the same thing with the next layer. I rolled out more fondant and put a layer over the top two cakes, then smoothed it out.
Next step was to start adding the doors, windows, and stars. I’ve read that you are supposed to use water to stick on the fondant decorations on a fondant cake, but I just used a little bit of butter cream on the backs of the stars, doors, and windows and it seemed to work out perfectly. After I had those all in place, I started piping in the door handles, and the details on the windows with some butter cream icing. Then I put one of the sugar cones on the top of the cake.I dyed a small portion of the icing purple and iced little stars using my start tip around the top cone. I used the same purple to do the stars around the bottom of the middle pillars. I also changed tips and piped in purple around the door, and windows. I dyed some butter cream pink to do the border around the edge of each cake. I used a shell tip for that. I waited to do the green grass in the front until I had the bottom pillars up.
To do the bottom 4 pillars, I used two regular ice cream cones. One upside down and one right side up. I iced each of the cones with butter cream, and then I rolled out some fondant and put that around the pillars. Worked out great. For the pillars on the middle of the cake, I just used a single regular cone. I iced it and did the fondant the way I did with the other pillars. When I was all through with the pillars I placed them on the cake. I then put a little bit of butter cream around the top rim of the cones, and then stuck on the pink sugar cones. I did pink small stars around the base of the sugar cone where it met the ice cream cone. After all the pillars were up, I stuck of few more of the fondant starts on there.
For the grass, I just dyed some of the butter cream green and used my shell tip to go all around the bottom of the cake. I got the princesses from the Disney Store and put those randomly around the cake, then stuck on the candles! I bought some fake tiny flowers from Michaels and cut some of those off to place around the bottom of the cake in the grass. Just gotta make sure not to eat those! You could also just buy some of the edible sugar flowers.
So that was my experience with making my first castle cake! I know this was a very long and detailed description, but I hope it helps someone out there who is new at this just like I was! It was very rewarding though to see the excitement on my daughters face when she saw her castle cake! Made all the hard work worth it!
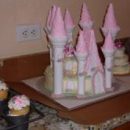
That is A very interesting cake, and a popular theme with the Girls these days. You did an Amazing Job with that Castle Cake. I might have to steal some of your ideas, but I believe I could do this one too. Thanks for Sharing!
Thank you so much. I’ve just gotten into the cake making over the last couple years. My daughters first and second birthday cake looked horrible. So I feel that each year I am improving little by little. I think it is so fun to do and seeing your kid’s eyes light up is the best! I wish you luck doing your castle cake! It’ll turn out great!