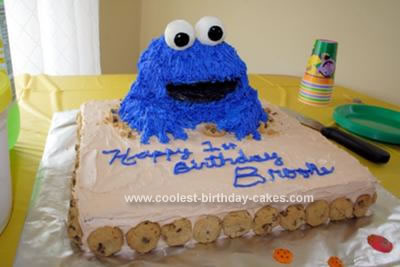
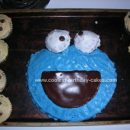
I made this banana chocolate-chip Cookie Monster cake with banana flavored icing for my daughter’s 1st birthday party. I got the idea from other similar cakes on this site!
NOTE: Box cakes are not suitable for this. You need a solid cake that won’t crumble or “sag”. Here’s the recipe I used, which I found online then tweaked to my liking. It was delicious!
BANANA CHOCOLATE CHIP CAKE
¾ cup butter, softened
1 ¼ cup white sugar
1 tsp pure vanilla extract
3 large eggs
2 ½ cups all-purpose flour
1 tsp baking soda
2 tsp baking powder
1½ tsp salt
1 cup pureed, very ripe bananas (about 3 bananas)
¾ cup butter milk (alternately 1 cup milk with 1 Tbsp vinegar)
1) Preheat oven to 350°
2) Grease and flour pan
3) Sift together flour, baking soda, baking powder and salt (do NOT skip this step as this is what will make your cake more fluffy and not heavy like banana bread)
4) In a large mixing bowl, beat butter and sugar until fluffy; about 5 mins.
5) Beat in vanilla and eggs
6) Add dry mix to wet mix, mixing until well incorporated.
7) Add banana puree and buttermilk to the batter. Mix well. Fold in chocolate chips.
8) Pour batter immediately into prepared pan and bake for 30-35 mins or until toothpick inserted in center of cake comes out clean.
ICING
4 cups of confectioners sugar
½ cup butter, softened to room temperature
½ cup shortening, softened
2-4 Tbsp water
1 tsp vanilla extract
2-3 tsp imitation banana extract (or until flavor desired is reached. If you use too much, add some vanilla to balance it out)
1-2 tsp meringue powder (optional only to thicken)
Beat ingredients on medium speed until blended. Add water and increase speed, beating for at least 5 minutes.
The base is one 13″ x 13″ pan, so I doubled the cake recipe for this. Immediately after taking it out of the oven, I popped in a regular round cake pan, the content of which I used for the neck and arms. I let both of those cool REALLY well.
I added a touch of Wilton brown dye to the icing to achieve a more cookie colour. Once frosted, I pushed in small chocolate chip cookies all around the cake. I let it chill in the fridge while I baked the “monster head” using a Wilton Ball pan. This allowed the frosting to really set as I knew Cookie Monster would be heavy and take some time.
Once those were cooled completely, I took out the base cake and placed the neck where I wanted it, then the arms which I carved with a serrated knife. The round pan was ideal as a shaper since, once I had cut out a circled neck, it left two arm shapes. I shaped/cut out his mouth using a serrated knife before sticking them together. I also serrated the bottom of his head so it would lie flush with his neck.
This guy alone took a full batch of icing. It’s best to stick with the old fashioned half shortening/half butter recipe, as well as a touch of meringue powder to get it thick. A lot of royal blue is also needed to achieve his colour. I used Wilton Black for his mouth.
His hair was done using a hair icing tip, and his eyes with fondant icing, which I stuck in with toothpicks. I just painted his eyeballs straight on, using Wilton Black dye and a Q-Tip.
I crumbled some cookies and spread them around the base of his body.

I love this cake & I’m hoping to re-create it for my son’s 2nd birthday. You mentioned you doubled the recipe. Is the double recipe just for the sheet cake? If so, how many more batches did it take for the round cake pan & the sports ball pan? Also, did you use regular chocolate chips or the mini ones? Any additional information or tips you have would be appreciated. Thank you!