Our 2-year-old daughter’s favorite character is Corduroy the teddy bear. She loves Corduroy. She even calls Teddy Grahams “Corduroys”. Not surprisingly, when given the option between Corduroy and a kitty cake, she chose Corduroy.
I have never decorated a cake. This would be my first and it would be for my daughter’s second birthday. I was a little intimidated at the thought of creating a specialty cake, and more than once I wondered if I should have called a bakery! However, I really want to make cakes for my children’s special events and I thought this Homemade Corduroy Bear Birthday Cake would make her birthday even more special.
I first considered purchasing a Wilton teddy bear cake pan, but I expected that I would not use it enough to justify the purchase and it would be shoved to the back of our cabinets taking up space once the Corduroy cake was made. So I decided to create a cake on my own using standard pans that many people have around the kitchen.
I heard a few horror stories about using cake mixes and not having enough batter when making a specialty cake. To avoid having a Corduroy bear that was hollow or missing a part, I decided to make my own from-scratch cake and icing. The cake recipe I used was from Sunset’s Easy Basics cookbook. It’s a butter cake recipe, very easy, but just as good as a bakery cake.
I made 2 batches of cake batter using the recipe. I made an 8-inch round cake and a 6-inch round cake with the first batch. With the second batch, I made 6 jumbo cupcakes and 12 regular-sized cupcakes. I used Wilton pans and I made sure that they were greased and floured very well. For the regular-sized cupcakes, I used paper liners. Once the cakes were done, I cooled them completely on wire racks and then sealed them in containers and refrigerated them overnight.
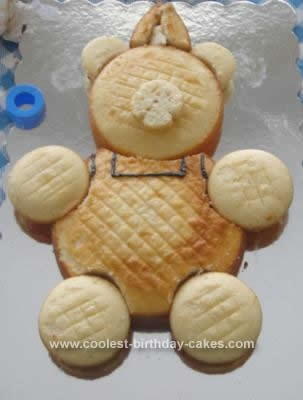
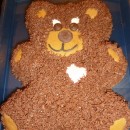
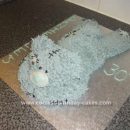
I used the 8-inch cake for Corduroy’s body and the 6-inch cake for his head. I cut an arc in the 8-inch cake so that his head would fit into his body and create the illusion of a neck (albeit, a very fat neck). I then cut arcs in the 8-inch cake for the paws. I used 4 jumbo cupcakes for the paws. I cut two regular-sized cupcakes to fit Corduroy’s head at the “10” and “2” position of the 6-inch cake.
To make his muzzle, I cut off the bottom of a regular-sized cupcake. In total, I used an 8-inch cake, a 6-inch cake, 4 jumbo cupcakes, and 3 regular-sized cupcakes. I used the excess cake that I had cut away from the 8-inch cake to fashion a party hat on Corduroy’s head between his cupcake ears.
Once the cake was assembled, I mixed buttercream icing. This is an old Wilton recipe that my mother used for years. It’s easy to make, ingredients of butter, powdered sugar, vanilla, milk, and easy to work with while icing. I mixed my own colors using Wilton coloring.
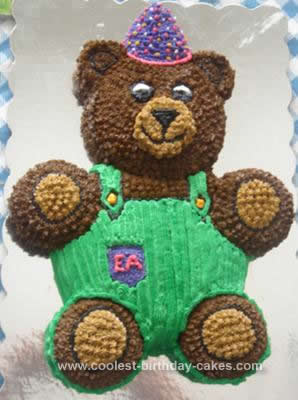
I used my late mother’s Wilton tips she bought about 40 years ago. It’s true that these tips last a long time! With a #4 round tip, I outlined Corduroy’s eyes, nose, mouth, paw pads, overalls, and buttons on overalls with black icing. I then filled in the dark parts of his eyes and his nose with black icing. I also made sure to secure Corduroy’s appendages (ears, hat pieces, nose, paws) to the round cakes using icing (I did not use toothpicks due to choking hazard).
I used a #18 star tip to create light brown “fur” on his muzzle and his paw pads. At this point I was glad that I had outlined in black. It made it so much easier to fill in the space with the stars. I then used the #18 star tip to create his fur in darker brown. I used the #4 round tip to outline Corduroys pocket on his overalls in purple and I used a #17 star tip to fill in the purple pocket and purple party hat.
I used the #4 round tip and white icing to fill in his eyes and I then made white “dots” on his party hat. I iced his green overalls using a #32 star tip. It was fairly large, so I filled in missed spots around the edges using the #4 round tip. Once the overalls were completed, I used the #4 round tip and golden yellow icing to fill in his buttons and put more ?dots? on the party hat.
Finally, I used the #4 round tip to write my daughter’s initials on Corduroy’s pocket in pink, define the party hat on Corduroy’s head, and make pink “dots” on the party hat.
The Homemade Corduroy Bear Birthday Cake was a joy to make. Icing it took about 4 hours, but this could be due to having frequent interruptions from a rambunctious toddler and an inquisitive infant. Also, I took a lot of breaks to decide on color shades and to mix more icing. Although it was time consuming, I’m hooked! I plan to make my younger daughter’s first birthday cake next month.

Great story and the cake turned out fantastic. Also nice to see someone take the time these days to create something rather than call Walmart. Look forward to seeing the next one.
Love the cake!!!
You are a wonderful mother to have taken the time to make such a wonderful cake for your little one. He looks so real.Good luck on the next one.
I was missing my bear cake pan and some of my others too. My grandson wanted a Winnie the Pooh birthday cake. After seeing your cake and reading what you used to make it, I tried some of your suggestions. Spring form pan, stainless steel double boiler pan, cupcake tin and a small cupcake tin.. and than I had my Winnie the The Pooh cake. Thank you.