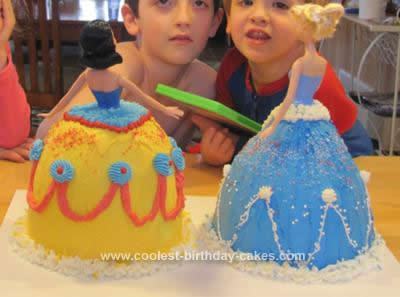
My 3 year old son is totally in love with Snow White. He is obsessed with her. His birthday is on January 29 and his older sister’s birthday is only one week after that. So, we usually have a combined celebration for them both together.
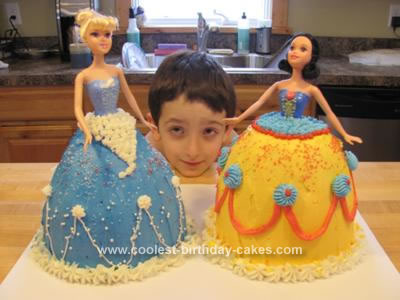
I knew I wanted to make a Snow White themed cake, but I also wanted to make something special for my other child. I searched and found quite a few examples of doll cakes.
To make two cakesI used my Pampered Chef glass batter bowl. Make sure to oil them well and then also flour them. I think you should let them cool for about 15 minutes before flipping it onto a cooling rack. It took about 50+ minutes at 350F to bake these cakes.
Then, I used my regular round Wilton cake rounds to bake off two cake rounds using a third box of cake mix. You have to do this in order to get enough height for the dolls. No problem.
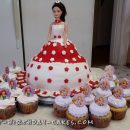
Then, I stacked the bowl shaped cake over the round cake using butter cream frosting to stick them together. I used a serrated knife to carve the shapes of the two together. Then I stuck the dolls into the cooled cakes and wiggled them around a bit to create a hole for their bodies later. I used my frosting spreader spatula to scoop out a little extra to be sure they would fit later. Then, the crumb coat went on and I tossed both of them into the freezer overnight.
The next day, I stuck each doll into the cake, then used tinted butter cream to frost the dresses. It was fun to decorate using your imagination! I invested a little bit in some expensive sprinkles to add glitter and some Disney-themed symbols like little candy blue high heeled shoes for Cinderella and candy red apples for Snow White. I used Wilton frosting tips for all of the detailed work – just using the star shape in varying sizes. When I finished each princess, I carefully used my frosting spatula to transfer the cakes onto a nice display cardboard piece. I finished each cake at the bottom using a large Wilton star tip to create the finished look. A few sprinkles followed and BAM! My kids are amazed and delighted.
First time project for me – it took a while to bake off the three cakes (I only have one batter bowl to use for this). I baked the two rounds at the same time that I baked off one of the batter bowls. So, it took a total of two hours for baking. I made the frosting up while the cakes were baking. Then, the cooling, carving shape, and crumb coat application took me another hour because I didn’t know what I was doing and took my time. So, three hours in the kitchen the night before.
One obstacle I had was the Cinderella cake was not quite tall enough to accommodate the doll, even after I added the Wilton round to the base of the bowl shape. Luckily I had some brownies on the counter top. I smashed up a couple of them and stuck them onto the top of the cake to create a little more “dress” going up to the doll’s bodice. I think it’s a good idea to save your cake scraps from when you carve out the shape in case you get into this predicament too. Then I tossed mine out the night before…then, I covered my fixed up area with butter cream frosting and my problem went away!
I had the frosting made up ahead of time and tinted, so the decorating took me about an hour the next day. I could have done this much faster, but I didn’t want to make mistakes after the time investment from the previous day.
So, about four hours total time, but this was a fun project and my kids all told me they are the best cakes they have ever seen. Worth it! Cost for these two cakes was about $3 for cake mixes, $3 for butter/sugar, $6 for Disney specialty sprinkles (yikes), and $8 x 2 for the dolls. So about $28 altogether and the kids will play with the dolls as keepsake toys.
I’m proud of this project! Have fun if you decide to try it for yourself!


Your comment has been sent successfully.