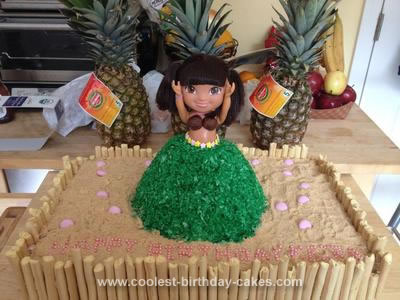
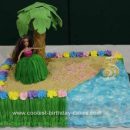
This Dora Hula dancer cake was made for my daughter Keira’s 4th birthday. Keira had just started her first year in Hula and loves it! So I decided to combine two of her favorite things into the cake, Dora and Hula.
When I first decided to make this cake I had no clue as to where to start. How would I get the hula skirt to look real? What kind of setting would the dancer be in? How big should I make the Hula girl? How big should I make the cake? So to get the creative juices flowing I went to this site to get some ideas and inspiration. I did a search for “Hula Dancer Cake” and a bunch came up. I took some ideas from a few cakes and then made it my own.
Preparation (Day 1):
I first prepared the base cakes on the Friday of before her birthday party which was on Sunday. Before I started baking I needed to decide on the size of the cake. Since I had a Wilton “Wonder Mold Kit” from a previous cake, I decided to use that for the Hula girl. Since the diameter of the base of the wonder mold pan is about 10 inches I needed to make a fairly rather large stage layer for her to be on…so I grabbed my largest pan which was something like 13×19 (I don’t have the exact dimensions since I’m not at home at the time of this writeup).
So I started baking Friday (I took the day off just to make this because I knew it would be a rather large project). The stage consists of two layers, each layer consisting of 3 times the cake recipe (basically 3 cakes! MASSIVE!). The first layer is an orange cake, the second layer is a chocolate cake with chocolate chips, and the icing is an orange icing. Each one took about 45-50 minutes to be done. To make the body I made red velvet cake about 1.5x the recipe and filled the pan about 2/3. Initially I thought it was too short but now that I look back at it, it was pretty proportional. Once the cake was done I let them cool overnight. I did not have room in the fridge to put this so I left it on the cooling rack.
Day 2:
The following day I made the frosting. I lost track of how much I made but it was a lot, probably about 6-8 cups. Before I added frosting I trimmed the edges off the cake to get all the tough parts out. I then placed the first layer on a cake board, added frosting to the top of the first layer, then stacked the chocolate layers on top of that. I then lined the edges of the cake with parchment paper to avoid frosting getting on the base board. Finally I covered the entire cake with frosting.
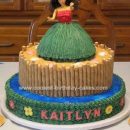
To decorate the outside border I initially wanted to use Piroutte cookies but they were so expensive about $6 per can. I would’ve needed 3-4 cans to do the border and most likely it would’ve gone to waste since it would’ve gone stale by the time people would get to it. I was fortunate enough to find these bread sticks at the Asian market for $1.49 per pack. I used 4 packs and had leftover.
The next step was to cut a hole on the wonder mold to fit the Dora Doll. I made a hole using a knife that you would use to carve a pumpkin; it worked perfectly. The doll was purchased from Walmart and it is the perfect size. It is also perfect because the clothes comes off easily and the hair can be easily modified if needed. To keep the doll clean I wrapped the bottom half with saran wrap and then stuck it in the hold.
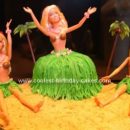
To make the coconut bra I used some chocolate fondant, rolled it into a ball shape and then stuck it on. I then used the flat end of a toothpick to make some indentations to give it some texture. The skirt I initially wanted to pipe using the grass tip from Wilton but that did not work out. The icing was very hard to squeeze out and it did not have an appealing look. I panicked and so I Googled hula skirt and found a suggestion to dye coconut flakes green. I tried doing a little and it worked so I stuck with it and it came out great!
Day 3: Final touches:
In the morning of her party I needed to do the final touches for the cake. For the waist I stuck on some pink and yellow candy stars. For the necklace I piped on a ring of pink frosting. For the sand on the stage I used a food processor to grind up some graham cracker and then spread it onto the cake. This actually added another dimension to the taste of the cake which was cool. I then put some strawberry Mentos around to make it look like rocks and the kids loved picking at it. The last thing to do was write “Happy Birthday Keira” on the sand. I wanted to make it look like natural writing on the sand but that didn’t stand out so I made the indentation using the edge of a spoon and then placed pink candy beads in the indentation to spell out the words.
Overall the cake is not a difficult cake to make. There was a lot of trial and error which took up a lot of time. If I were to make it again it would take a lot less time.
The reaction from the birthday girl made it all worth it. The first thing she said when she saw it (before I put the skirt on) was “Daddy it’s beautiful.” That gave me motivation to finish the cake and make it perfect. The comments from others were very positive and I am happy that everything turned out the way it did.
Your comment has been sent successfully.