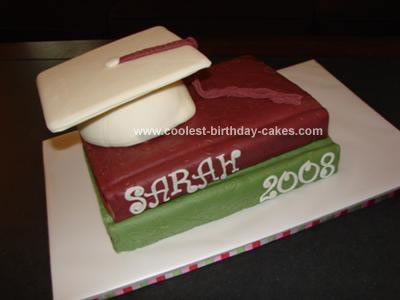
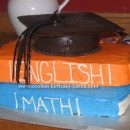
This graduation cake was made in 2008 for a friend.
Bottom of cap: I baked the bottom of the cap in one-half of the Wilton ball pan (if you don’t have that pan, you could also use an ovenproof bowl). Iced it, then covered it with fondant, making the fondant come to sort of a point in the front. I used a pattern marking wheel (that I use only for cake-making) to create the look of “stitching” around the bottom edge.
Mortar board: I lined an 8×8″ pan with wax paper (it should be as smooth as possible), melted some Wilton candy melts and then poured them in. Popped it in the fridge to harden. Cut a square of fondant about the same size, used a TINY bit of light corn syrup to stick it to the top of the candy melt square, and then did the faux stitching around the edge and in an “X” shape across it as well. A flattened ball of fondant was the “button” on the top (but don’t put it on until you are ready to assemble the cake.)
Books: They were baked in rectangle pans, and then sculpted just a bit on the edges to get the outward curve on one side and the inward curve on the opposite side. (Do the sculpting after freezing the cake firm, or it will crumble.)
I tinted and rolled out fondant on a large sheet of textured plastic, Applied a sheet of freezer paper over the textured fondant, gently flipped the whole thing over and then peeled off the piece of texturing plastic that was then on top; I then had a smooth-looking piece of fondant, with the embossed side down. Cut to the size and shape needed to cover just the top and front side of one of the books. Next, I flipped the whole thing over onto an iced book cake, positioning it correctly and tucking under the front edge of the book. Then ran a ball tool a little way out from one side, to create the look of the book cover crease. (All the flipping is necessary so you don’t stretch the embossing out of shape.) I did white strips of fondant for the sides, and used a pizza cutter to texture them to look like pages. (Save some book-cover-colored fondant; you’ll need it during assembly.)
Did the second book the same at the first.
Lettering: I used gumpaste cutters (let the letters dry before you apply them to the cake.)
Assembly: First, I put the less-attractive book on the cake board. Then cut strips of the book-cover-colored fondant to put around the three “pages” sides of the cake, to look like the back cover of the book sticking out.
Next, I cut supports (I use bubble tea straws) and inserted several into the cake, to hold up the next book. I slid the next book onto a cardboard cake board, cut and positioned so that there was a tiny sliver extending out on the three page sides, but no edge showing at the other side. Put the cover-colored strips around the three page sides, completely covering the cake board. Then positioned the book atop the other one, angled slightly (it looks bettter if the books aren’t stacked straight).
Next, I cut supports and inserted them into the top book cake, where the cap would be. Then placed the bottom of the cap (which was on a cake circle, cut to hide all the edges) on one side of the books, angling it so the “point” of the cap would show.
Then hammered a dowel all the way through the center of the ball cake, down to the bottom cake board. (This holds everything together.) Next, cut some supports to insert in the ball cake to hold up the mortar board. Then I placed a dollop of frosting at the top (hiding the dowel hole) and positioned the mortar board.
Tassel: You need to wait to make the tassel until after the cake is assembled, so it can dry in the proper position. I used an extruder to make the long tassel strings and the “rope” at the top. Extruded some more strings to go around to look like a knot. Then draped the whole thing in position, and stuck the button on the top.
Last, I placed the lettering on the books.


Very impressive cake!
How creative!!! Thanks for sharing.
so many bad cakes, so good to find a good one and then such great and pinpoint directions without all the fluff – needed a good mortarboard idea and you had it. thanks!
Dodi