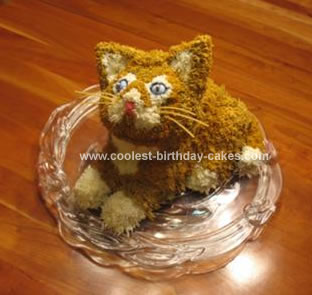
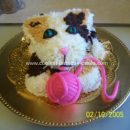
First off, this was the hardest cake I’ve ever made (but also the most rewarding). I wouldn’t recommend attempting it unless you already have some 3D cake experience under your belt and some confidence. It can be daunting when you’re trying to get things to stay together. My daughter really wanted a 3D kitten cake this year. I wasn’t sure how to go about it and couldn’t find any on-line that I really liked, (just the usual round faces on a platter), so I used a picture of an actual kitten (from a Google image search, of course).
Here are the basics: I baked a round 9 inch cake (halved and then frosted together upright for the body), one small rectangular cake (for cut-outs of ears, legs, paws, tail), and one cake in a small aluminum mixing bowl. I had to do a lot of “carving” to get the shapes just right but this wasn’t hard to do after freezing the cakes and using a sharp serrated knife. (The key is in the freezing!)
The back legs were made of two parts: two circles (I used a large jar as a “cookie cutter” to make cut outs from the rectangular cake. These were then frosted to the “body” standing upright.) and then two “paws” which were just cut out free hand with a knife. I used a dowel (chopstick cut in half) to hold the head onto the body. The ears were tricky (the right one I did 3 times) and I used toothpicks to hold them on. (I would recommend chopsticks because that right ear started sliding and I had to add a lot more toothpicks!)
I crumb coated everything with white frosting and then mixed orange and light brown frosting in the same bag (half and half) to get the mottled color effect). I used the “grass” or “hair” tip (which has about 12 small holes in it). This is my new favorite tip. It’s so much fun to use!
The face was very hard to get right. Eyes are tricky. These are Cadbury chocolate eggs with the pointy end of the egg pushed into the cake. I then used black frosting with a small tip to give them a less round appearance. And black and white frosting for the pupils. The mouth is just a little pink frosting. The whiskers are thin spaghetti noodles (angel hair would have been better) that I boiled for just a few minutes to soften them up a little bit.
It was a bit stressful to make as I had no idea how it would come out but, I must say I was very pleased. My daughter was absolutely delighted – and, of course, that’s the best part. (It WAS hard to slice up – although the 7 year old girls didn’t seem to mind. They all requested various body parts.

very cute Kitten
That’s the coolest cake ever! I want to make one for my 3-year-old daughter’s birthday. She has a pink stuffed kitten that she loves and I want to have the cake to remember it long after the thing has fallen apart. Can you tell us what size the small aluminum pan was that you used? Again, great cake! I’ll be thrilled if mine turns out half as good!
The head and ears keep sliding off, despite the skewers. 5 hours till the party…
This is a great cake and very inventive. My daughter and I are going to try it this w/end for my granddaughter’s first birthday. I know it will be a big hit!
My daughter wants a kitty cake too. If you are looking for a way to simplify tricky body parts, use cake for the body and head and use rice crispy treats for the more difficult areas. Cereal is much easier to work with and kids love it!
I am making a 3D Lion cake for my son’s first birthday. Your tips were very help since I am going to start building my cake tonight. I wasn’t sure about the freezing part so thanks for the info.
What size bowl did you use for the cat’s head.
That is very cute! You did a fantastic job!!
I am making this kitten cake for my 11 year old daughter, she has been talking about what cake she wants and I showed her this one she hopes it turns out but we want to know the size of the aluminum pan you used. Thank you
It is really good. You should enter a cake contest.
Well done! Your kitten cake is absolutely amazing & it looks so lifelike. If you can make a cake like this, you are capable of making any cake.
Whoops! I hadn’t checked comments. Hope everyone’s cakes worked out! The stainless steel bowl I used for the head is 5 1/4 inches wide and 3 inches high. I let the cake puff up and didn’t trim that part off so it would be more head shaped. It is inverted on the body. Now that I know a bit more about cake making, I’d recommend plastic cake dowels over chop sticks or toothpicks! They are hollow and more sturdy AND easier to use. Hope this helps! Good luck, everyone!
I am sure it is too late but I was wondering if you had any pictures from other angles? I am making this cake for my daughters first birthday and wanted to see what the cake looked like from the side? This is the best cat cake I have seen and I have been looking for a long time!
Thanks so much for this. I found your instructions were very clear and easy to follow. It wasn’t too hard but it did take a long time. It was my first 3d cake and I really enjoyed making it.
My daughter loved the cake and took lots of photos of it.