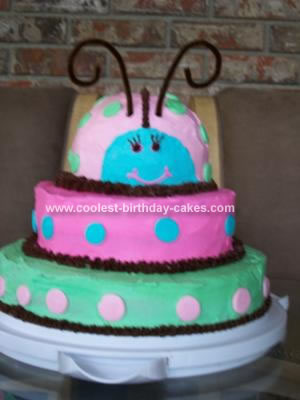
The sizes of the tiers are 12, 9, 6 inches. The 12 inch took about 1 1/2 cake mixes, and one layer was enough. I baked the 12 inch at 300 for an hour – made a nice thick, even cake. I did 2 layers of the 9 inch. And the ladybug was made of a 6 inch round and to get the “dome” shape I used a stainless steel bowl.
The polka dots on the Ladybug Cake were made with the same icing that I used on the cake. I piped them onto wax paper, then dipped my finger in cornstarch (so my finger wouldn’t stick) and patted them down flat. Then I put them in the freezer and once they were good and frozen, I gently removed them and placed them where I wanted them. I had a good thick layer of icing on each layer (mostly because we LOVE icing) and so I just gently pressed the dots into the icing. The dots did begin to thaw quickly, so I had to keep freezing them until I was done.
The party was not at our house, so I kept the tiers separate until we got to the party. Then after putting them all together I piped stars at the base of each tier to hide the cake boards. I learned a couple things from my mistakes: if you’re going to use cake boxes for the separate tiers, get a size up (i.e. for the 12 inch tier I needed a 14 inch cake box – oops! that was an extra trip to get another container for the 12 inch layer.) And using cake boards made it easier to move them around when putting the entire cake together. I bought a big pack of 12 inch boards, and cut them down as needed.
This is the first cake I’ve ever really decorated, other than the “trial run” I did a couple weeks beforehand. I started baking Wednesday night, and the party was Saturday. It was a slow, but very rewarding process. I didn’t know if I could do it, so I was pretty excited about the finished result! And most importantly, my little girl was thrilled about her ladybug cake!







Your comment has been sent successfully.