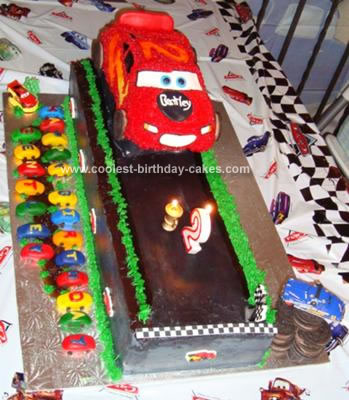
This Lightning McQueen cake took 2 days, and had several mistakes, but it was my third cake that I have ever decorated, so I learned a lot. I used the Wilton cruiser cake pan, but really you can use regular pans and build your cake, this pan was a nice easy design once finished, but for me, a novice, it gave me some trouble finding a cake that cooked evenly.
Once I finished (using a box cake but anything light should be fine, sponge cake in particular) I froze the cake. Then I carved the cake as best I could to match McQueen, saving the shaved pieces to build up over the tires in the front and back. I then glued the cake pieces on with icing, which was Swiss Meringue buttercream, and dyed red with the Wilton no taste concentrated red dye.
I then covered the whole cake with a crumb coat, using my pastry bag and tip to pipe it all over then smooth it out. After letting the icing cool in my enclosure (winter time) I brought it in and started making the fondant pieces, one by one ( would have been easier to size and shape the pieces using your finished cake as a guide and cut out templates so you can have them made ahead of time, but you want them to be soft enough to mold them to the car without breaking, so this worked for me, just took a lot of time.
After dying and shaping all of the pieces (2 lightening bolts, #2 for the top, rear windows, side windows, front windshield and eyes, mouth and front lights, also build the back spoiler with fondant and let it sit to harden) ( I painted over some with my finger and the food coloring using black, as well as the lightening bolts and #2 to help blend the colors I tried to blend when mixing the fondant). I let the car set again and made the very red icing for the buds on the car.
I made this icing more red as it would be seen, (it took a LOT so buy several bottles of red no-taste). I also had to add a touch more lemon to the icing to help get the flavor back. At this point it was very late so I left the budding til the next morning, but you can keep going.
I also forgot to mention that I outlined the windshield in the front with a tube of black Wilton icing (not gel) and used my writing tip. I also went around the back windshield and the front lights.
Also I must mention that if you make mistakes it is easy to fix, like for example I put the #2 on the wrong way when I placed my car on my bigger cake, it was upside down, I was not happy with it when I fixed it, but it was not visible to others. I went around the entire cake using my star tip to make the little buds, but I tried to stay in a uniform pattern so that the cake looked neat and not sloppy.
In the end I made a small black disc with fondant and used white fondant to spell my son’s name which was actually very easy, and looked great! I used chocolate Oreos for the wheels, and I did not put them on until the car was on top of the large cake, which is when I also budded the bottom of the car so it would not get messed up when I transferred it.
The large cake is two slab cakes, cut in half, turned to meet end to end and make a long narrow road, then again to make a top layer which I filled in between with vanilla pudding mixed with a tad of lemon extract to get a nice thick pudding but a lemon flavor! I used Swiss meringue buttercream again with black food coloring, and I used the grass tip for decorations, however I had a lot of leftover red and no more white or green, so i improvised by filling in some mud/dirt as well.
I had already made the little cars with marshmallow fondant that I had tried making and was surprised how easy it was,(the rest of the fondant was premade and bought, I just had to dye it). I colored them all into tiny balls, then later molded cars with my hands and used mini chocolate chips for wheels. They were suppose to sit on mini cupcakes, but I ended up using left over slab cakes instead of a thin sheet cake for the road, and did not have enough guests to justify making cupcakes as well and I did not leave enough room on one side of the cake for the “happy birthday” cars, so they all went on the bottom.
I also piled up some Oreo cookies for Doc Hudson to sit on the sidelines. I used cars candies for the outside edges! It tasted great, I used pillars that were too high so I used black fondant around the underneath of the car to cover it, and a piece of cardboard cut to size on top to support the weight of the car which also helped me lift it off to give my son. We ate the slab cake!
He had a blast with the car, and was quite excited that he was able to demolish it all on his own!

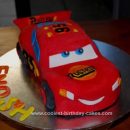

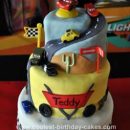
I have more pictures to show the steps if anyone wants more info just post a comment and I will reply!
I have a cake to make for a 4 year old who loves Lightening McQueen. Could you post more pics of the steps.
Thank you for your help!
hi i am attempting to make my son’s cake this year, could you give me the steps and give a sister some help.. thank you…
thank you so much
HI, I LOOKED AT ALL THE HOMEMADE CARS CAKES AND THEY R ALL SO PRETTY, I AM LOOKING FOR A TOWMATE HOMEMADE CAKE, IF ANYONE CAN HELP ME WITH THIS ONE PLZ DO. TY VERY MUCH AND KEEP BAKING LOL
Sorry to those of you who had asked for help. I thought I was being notified when comments were posted.. if anyone has any questions don’t hesitate to ask!!
sorry again!
i tried making a Cars cake too and used the Wilton no taste red and could not get it red enough.