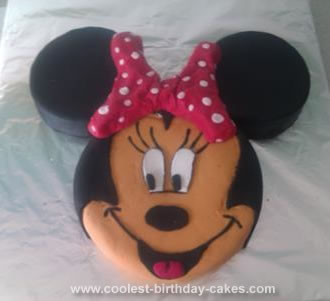
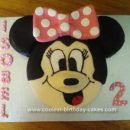
My daughter said she wanted a Minnie Mouse cake for her 5th birthday so I thought I would give it a go. I looked on this site and got lots of inspiration from others that have already done a really good job so I thought I would have a try.
My mother made the cakes for me – 3 Victoria sponges, 1×8 inch for the face and 2×6 inch for the ears. We then cut each cake in half and covered it in jam to give it some more flavor. Then came the fun!…
I managed to find ready to roll icing in black so the ears were both quite straight forward – roll the icing out, cover the cake with hot jam, put the icing on top, pat round and cut off any surplus. I used icing sugar on the kitchen surface to stop the icing sticking as I rolled it out; some icing sugar went on top of the ‘ears’ but we just wiped it over with a damp cloth and they came up nice and clean.
Next for the face, I kneaded some ivory coloring into the white, ready to roll icing to make a nicely colored face. I probably used too much coloring but never mind. I covered the whole cake with this icing, in the same way as I did the smaller ones, and that was quite easy. However, the next part took a loooong time. I rolled out some more black icing and cut it round to make the hairline. I did this several times but cold not get it to look right.
One reason was that I was just putting the hair on top of the face and not round the side – bad idea. Eventually I cut up a cardboard template and made half the hairline and the side of the hair in one cutting. Then I did the other side and just cut and smoothed the joins. The middle was a bit messy but it got covered up by the bow.
Mum and I made lots of different eyes and mouths before we were happy with the results but eventually we got there. I had some black food coloring which I used for the eye lashes, to line the eyes and for other bits of detail on the face. The whole thing took three and a half hours!
Finally there was the bow. Someone recommended that I make a bow a few days in advance to give it some time to dry out and so hold its shape. Unfortunately though the first one I made was too small and thin and just cracked so I made a really big one and then put it in the airing cupboard to dry out overnight. It looked OK but I had the same problem as one of the other ladies and had to prop it up at the back so it didn’t fall down. We used cardboard and foil to make a stand.
I put little blobs of icing at the top of the cake board and stuck the candles in there, rather than spoil Minnie’s face. I must say I was thrilled with the result. Close up you could see little imperfections which haven’t really come out on the photo but all in all it was a great success and 5 year old’s are very forgiving…she loved it!


I think your cake is fab you done a great job.im also making a Minnie mouse cake for my daughters 2nd birthday hope it turns out as wellx