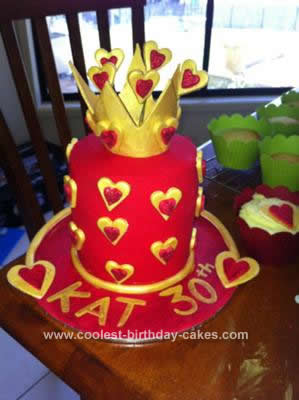
This is a cake I recently made for a friend’s 30th birthday. It was a ‘villains’ party and she was attending as the Queen of Hearts from Alice in Wonderland. I really wanted to create something striking and quirky to capture her personality. I actually made two cakes for the party but this cake was the biggest head turner; people were stunned by this cake. This cake is actually the cutting cake, the guests ate delicious cupcakes in the same flavor. You can see on of the cupcakes in the background.
The first step was to make the the decorations. Using fondant I colored a small portion, about the size of a of a golf ball, with golden yellow paste, rolled it to a workable thickness (approx 5mm) and cut out a crown shape using a template I had created. One of the issues I found with this is the the thicker the fondant the less successful I was because the weight would be too much during the drying process. I created a cardboard cone as a support structure for the crown while it was drying. I glued some of the hearts I made on after it was completely dry.
The hearts were created by using three different sized heart cutters and thin sheets of fondant. For the small hearts I used red colored fondant and golden yellow for the larger size. Once they were cut and dried each shape was painted with either red edible glitter or antique gold decorating paint. These were stuck together with sugar flower glue once dry.
The cake itself is a spin on a black forest flavor which is my friend’s favorite cake. Basically I found a great mud cake recipe, added some black cherries soaked in coffee liqueur. The cake was very moist, which was delicious but challenging to decorate when stacking two or three cakes on top of each other for the shape. I included rods and a cake board between each layer to strengthen it.
The icing is a whipped ganache, 2/3 of a cup of cream to 250 grams of white chocolate. Add the color to the mixture when melting the chocolate with the cream. This eliminates the chance of over whipping it later. This needs to be whipped once it has cooled overnight and just before applying to the cake.
That’s about it. The cake looks spectacular but is really very simple.


Your comment has been sent successfully.