To make this Homemade Teenage Mutant Ninja Turtles Birthday Cake you will need to choose what kind of cake you would like eg: Choc Mud, vanilla or strawberry etc. You will need to double all ingredients because you need two cakes to get enough height for when your attaching the shells.
While the cakes are cooking get out your fondant (you can buy ready made or make it yourself before you start cooking). Choose the colours you need: red, blue, purple, orange, black and brown (you will need some white fondant too). If you don’t have purple or orange you can use primary colours to make your own (although this is very time consuming). Blue and red will make purple and yellow and red make orange and orange.
When colouring your fondant its easier to do it little by little so grab a tennis ball size amount of fondant and kneed it till smooth but not sticky. Use corn flour on bench top to stop sticking when kneading and rolling out fondant. Using your finger make a little well and put 1 drop off colour in and start kneading (be mindful if using liquid colours that some may drop onto bench top or hands (so for this part latex gloves are handy). Once all colour is mixed in get another tennis ball sized fondant and continue colouring. For the red to cover cake once you have about 4 balls coloured kneed them all together and put to one side. You will need about 4 balls of green You wont need as much of the other colours, one ball each is more than enough(excess icing can be frozen).
By now your cakes should be be ready to check insert a metal skewer and if it comes out clean they are ready so take them out of the oven and let them cool for roughly 10mins before turning them out onto cooling racks. While the cakes are cooling start mixing your butter icing and continue colouring your fondant. Once your cakes are completely cooled you will need to cut off the top to make it level then place the cake on the cake board upside down so you have a nice edge and cover all over lightly with butter icing (this is called a crumb coat and doesn’t need to be neat)now place 2nd cake upside down to get the nice edge directly on top of 1st cake and cover with butter icing and place cake in the fridge.
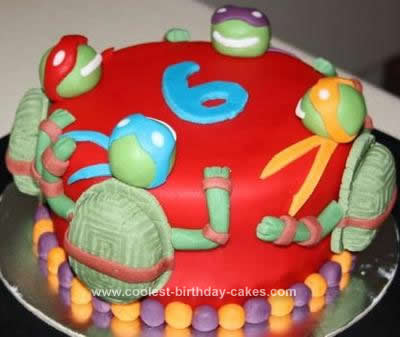
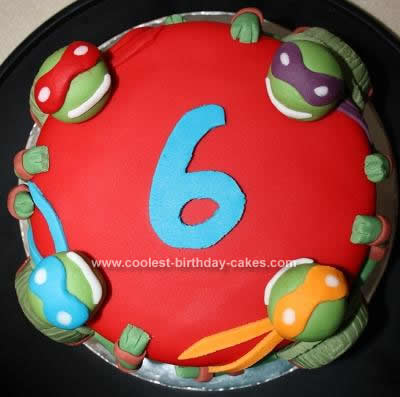
Now while the cake is chilling you can start on your Ninja turtles heads. It’s easy really just take a marshmallow sized amount of green fondant and roll into a smooth ball, make 4. It doesn’t matter if it has some lines, choose the side that’s smoothest and that will be the face. Then take a small amount of red, blue, purple and orange fondant and roll into a snake/log the roll out flat. Using a very sharp pointed knife cut out the shape of the TMNT mask. Then cut tiny holes in masks and roll tiny white balls and stick them into holes, now using a very tiny bit of water wet the back of mask and stick it to the head then cut 2 small lines to make the ends of mask stick heads on top.
Now roll out your red fondant and take the cake out of the fridge smooth down any rough bits on the cake and apply another coat of butter icing.
Now carefully lift rolled red fondant and place over cake. With your hands smooth out the top cake gently getting rid of bubbles, cup your hands and smooth icing around the top edge then slowly smooth out around sides, cut off excess icing and continue smoothing out until it has all stuck to the icing. Roll some little orange and purple balls and stick with water to the bottom edge off the cake this will hide any messy edge.
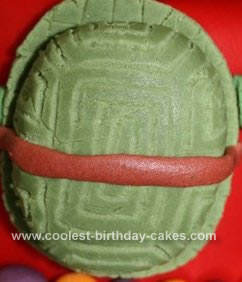
Now its time to add your decorations. Roll out some blue icing and cut out the number of age and dab a little water on the back a stick to the middle of the cake then do the same with the heads. Place cake in the fridge and we make the shells and arms. Take some of the left over green and roll into snakes/logs and bend gently to make elbows you will need 4 bent left and 4 bent right then using a very tiny bit of black colouring kneed green fondant so the green goes slightly darker this is for the shells. Roll it out flat and cut it in an oval shape than take a butter knife and lightly indent lines all the way across the oval then turn and do lines across those lines so you have a tiny diamond pattern. Now take 4 egg sized amounts of the darker green and roll in your palm to get an oval shape and flatten one side, with a little water stick flat side to the middle of the flat oval and take a tooth pick and gently draw lines to make the shell pattern. Now you’ll need some brown fondant roll little snakes/logs and flatten then stick with water to the bend in arms and across where the wrist should be and across the middle of the shells. take the tooth pick and make 2 indentations in the top of the arms at the end, these make the fingers. Now carefully using a little water stick the shells onto the side of the cake making sure the heads line up in the middle The shells will be heavy so make sure they are stuck tight before letting go. Then attach the arms so it looks like they are climbing up the side and your done!
I hope the details in this helps you to make the best possible TMNT cake you can. Good luck and have fun.





This cake is great, Good job!