When my son Caleb turned three years old, he requested a Thomas the Tank Engine birthday party. After looking at all of the Thomas cakes on this site, I decided not to try a 3-D train cake this year and instead went with the sheet cake version. I knew that my decorating time would be limited because I’d be working around my 3 month old baby girl’s eating and sleeping schedule, not to mention the almost 3 year old boy’s schedule too! (Thank you to everyone for your honesty about how long it took to decorate these cakes, and for so generously sharing your pictures!)
I purchased a Wilton Thomas cake pan off e-bay (though I later found out that I could have rented it very cheaply at a nearby store- whoops!), printed the decorating instructions for the pan at the Wilton website, and bought an 11×15 sheet cake pan at Party City. I made the sheet cake chocolate and Thomas was vanilla. I was sure to grease both cake pans generously using a pastry brush and shortening, then floured them too. And for the first time ever, I had no problems with either cake sticking to the pan!
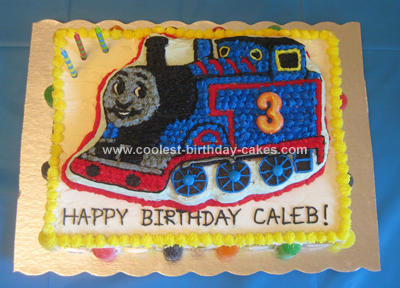
Since I was crunched on time (and energy, what with the baby), I used store bought cake mixes and store bought vanilla frosting. I even bought the Wilton colored icing tubes, and just screwed on the decorator tips that the Thomas directions specified (plastic tips #3 and #16). I was so glad that I did that, as it saved me a bunch of time and hassle to not have to mix all the colors myself. Plus, it was very easy to switch the tips out. The only colors that I did end up mixing were the light blue background for Thomas, and the gray face. That gray was TOUGH to get, as it kept looking purple from the black food coloring I had! Finally I tried some Wilton black dye that I had leftover from another cake I’d made months ago, and it worked perfectly. You only need a very little bit added to the white icing.
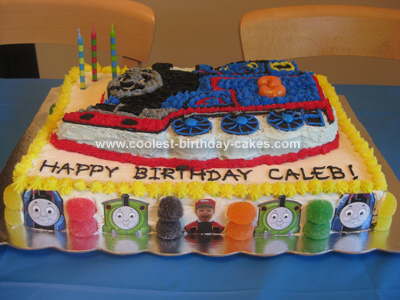
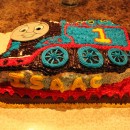
I frosted the sheet cake with (store bought) white frosting, then placed Thomas onto it. I carefully followed the directions that I had printed out to decorate Thomas, and I think he turned out well! It did end up taking me more time than I thought to frost Thomas, because my hand kept warming up the icing tubes too much. I had to keep stopping and putting the icing tubes in the fridge, then would continue decorating. Thomas is a fairly challenging cake to decorate, but if you have some time and patience, it’s worth the effort! I then wrote out the happy birthday on the sheet cake using the black store bought icing tube with the small decorating tip.
I thought it would be fun to add Thomas, James, and Percy around the sides of the bottom sheet cake, so I cut up several of the Thomas paper cups that I had also bought at Party City. Why not use what you’ve already got, I figured! Then I cut some gumdrops in half to put between the trains. I also cut around a picture of my son, who had been James the train last Halloween, and put him in the middle of both long sides. I stuck all these items on with dabs of frosting. The last touch was adding a 3 onto Thomas, since Caleb was turning 3. I actually used a candle that I’d found at Target for that 3, and it was the perfect size and color!
I was able to get everything done during both kids’ naps in an afternoon, so the decorating took a couple hours total. Caleb was THRILLED with his Thomas the Tank Engine Birthday Cake! He thought it looked just like Thomas, he loved seeing himself on the sides of the cake too, and was just dying to pluck off those gumdrops and eat them. After we sang “Happy Birthday” the next day, Caleb requested Thomas’ smiling face as his piece to eat. I made my husband cut that- and I couldn’t watch after all my work.


Oh, and the wheel axles are blue M & Ms. Just thought that gave another nice touch.