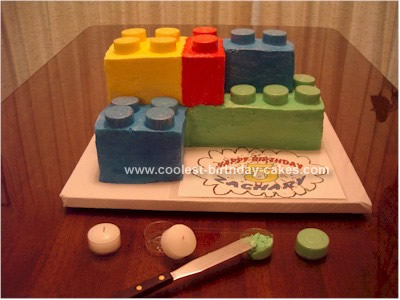
Lego Cakes . . . FORGET USING THE MARSHMALLOWS or mini-muffins! I’ve decorated cakes for over 30 years and hold myself to a very high standard as far as to what my finished cakes look like. Buttercream-frosted marshmallow halves or mini-muffins just didn’t measure up! My Tip for Lego Birthday Cake? I removed UNSCENTED TEA LIGHT CANDLES from their CLEAR plastic forms. I washed and dried the circular forms and then filled each one with the same frosting as I was using to frost the cake. Turn them upside down and place them directly where you want them on the frosted cake top.
The size of the tea light form is perfect for a 9″ x 13″ cut into three equal widths for the Lego blocks. Afterwards you can still use the candles by inserting them once again into the washed forms. Both the cake and the steps to make the “connectors” are shown.
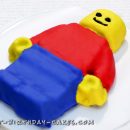
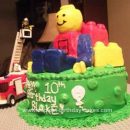
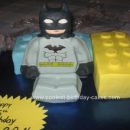

Great idea!
Are they refrigerated before removing them from the teacup mold?
Fantastic idea with the forms! I have been searching for a better way than marshmallows! I am thinking of filling them with melted chocolate instead of frosting!
You actually don’t have to removed the icing from the teacup. You just put the teacup up-side-down on the cake.
Hi!
I am trying to make the cake w/out marshmallows…but the tea light candles i am finding have silver molds around them, not clear. Where did you find yours?
Peak Candle Supplies in Denver carry the clear tea light cups. You can order them from their website (www.peakcandle.com).
Wow! Beautiful. Does it matter if you use a foil teacup cover? No one is going to see under the icing. Also, is this two 9 by 13 cakes stacked on each other to achieve the height of the blocks?
You said the details to form the cake are shown but they are not. I was wondering what the layering was and how trimmed this cake. If you froze it before icing it?
Did you have to freeze tealight with the icing inside or did the frosting just come right out on top of the cake?
Thank you!
Four cakes were each made in 9″ x 13″ pans — then two cakes were stacked together to form one cake. You will now have only two cakes, two layers each. I did not freeze the cakes before stacking. If you decide to freeze the cakes make sure that you put the frosting or filling between the layers THEN LET THE CAKE COMPLETELY THAW OUT BEFORE FROSTING THE SIDES AND TOP.
To make the Lego “bricks” divide each cake as follows: NOTE: the width is 9″ and the length is 13″) For first cake, cut the cake in half length-wise, keep one-half whole (4.5″ x 13.0″). Cut other half in half width-wise making two 4.5″ x 6.5″ sections. For the second cake: cut into three equal parts width-wise so you have three “bricks” measuring 4 1/3″ x 9″.
In regards to the clear tea light forms:
1) Fill each CLEAR tealight form with the same color of frosting as the “brick” you want to put it on. Simply turn the form up-side down and place appropriately on the cake top. The FROSTING STAYS IN THE FORM. THE FORM STAYS ON THE CAKE. The color will show through the clear form. The forms are not frosted on the outside. Do not refrigerate or freeze the filled forms.
2) Buy tea lights with clear plastic forms at Michael’s.
Hope this clarifies the details for those of you that asked questions. Thank you very much.
My gosh, what was I thinking?! I looked again at my photo OF Lego Cake 38. I REALIZED THAT I ONLY MADE TWO 9″ X 13″ CAKES (NOT FOUR!). Stack those two cakes and then cut them as follows:
1) Cut in half length-wise. Leave that section whole (4.5 x 13″).
2) Cut the second half in equal parts (4.5 x 4 1/3″.
3) The cut ONE of those three sections in half again – it doesn’t matter which direction you make the cut. Each side is almost equal in width and length.
4) Frost each section in various colors and arrange/stack as shown.
Good thing I realized my error! You would have ended up with a monster-size cake!
Hos do you get your icing to look so nice?
Once the cake is completely frosted, fill a glass or cup with water. Dip a metal knife/spatula into the water and then run it over the surface of the frosting (do top first, then sides). You will have to re-dip your spatula many times until the entire cake is done. Use the edge of a paper towel to dab up any excess water that collects at the bottom edge of the cake. LET THE FROSTING AIR-DRY COMPLETELY BEFORE DECORATING! You will never be able to get the cake’s surface completely smooth, but don’t worry, once the cake is dry and decorated, no one but you will notice!
I’m giving this a whirl tomorrow night but wondering how you get your edges so nice and square? In a regular 9×13 pan, mine always bakes up into such a dome (where the edges are much thinner than the center). I’m worried about getting the blocks looking truly square. Advice? Thanks so much!
The baking pan must be “wrapped” with strips of insulated material.
I think you can also buy them at Michael’s.
Personally I use old towels cut into strips.
For a 9″ x 13″ pan cut a strip 6″ by 47″. Fold the 6″ dimension into thirds so that the strip becomes 2″ by 47″.
Wet the strip. Wring out excess water but make sure it is not “too dry” (the moisture is what “insulates” the pan and allows for more even baking. The moisture will, of course, evaporate during baking).
Use a safety pin, large paper clip, or large paper clamp to secure cloth around pan.
Make sure your cake batter is evenly distributed in the pan before putting in the oven. Bake at temp and time as directed.
Hope this helps.
Did you frost each “block” and then stack? or you stacked them and frosted? Why can’t I put the filled tea light cups in the fridge? I planned to complete the cake on friday and serve at a party on saturday and I usually keep my cakes in the fridge until just before party time.
I bake my cakes on a lower temp- usually around 300- and they tend to bake up more evenly on top and I don’t have to level them with a knife or cake slicer. I use a 9×13 pan that has very distinct corners and it bakes up nicely without rounded corners. I always coat my pans with Baker’s Joy- spray with flour- and rarely have a problem with the cakes coming out of the pan.
Did you make you cake mix from scratch or did you make it from a box mix, if so what kind/brand?
It is near the end of May and I was only notified of your question today, Rebecca (April 10, 2012). Sorry this reply is so long after you made your cake. For others who may have the same questions . . .
You can refrigerate the frosting-filled tea light forms. I think the reason I suggested not refrigerating or freezing them is that early on many people seemed to think that it was necessary to solidify the frosting so it could be removed from the mold. Of, course, that is UN-NECESSARY! The frosting stays in the form and the forms are placed upside-down onto the surface of the cake.
The “rectangles” of cake are stacked first with frosting in-between the stacked layers just as with any layer cake, then frost the outer surface.
These are amazing! Thank you for sharing your neat idea using the tealight holders! I am planning on a Lego Party and will definitely be utilizing this tip!
This is a beautiful cake! However after careful consideration I’ve had to opt for the marshmallow technique instead of the tea candle holders, since I like to have everything on my cakes be edible. Also, knowing my children and their goofy friends, they’d try to eat the plastic tea candle holders even if they were told they are plastic. Ha!
Thanks for the great tips — your cake looks very lego-like indeed.
Thank you for sharing this! So glad to have all your tips. I read your tea light idea too late to find clear ones, but I used metal ones I had laying around to cut out rice krispie treats into that same shape which I then frosted. It worked out really well…and it works out better if the kids want to eat them! Easier to frost than marshmallows or mini muffins for sure.
How many does this cake serve?