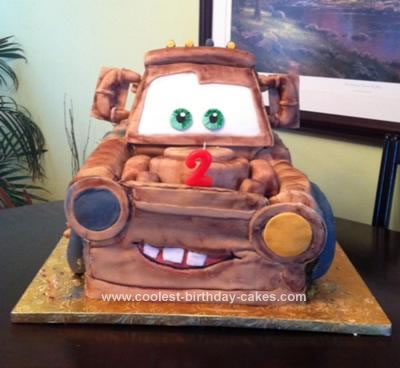
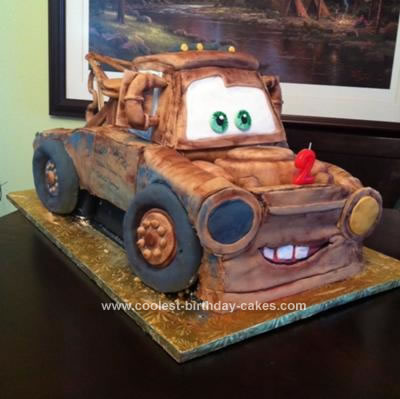
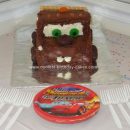
I made this Tow Mater cake for my son’s 2nd birthday. Cooper loves the Cars movies and especially Mater. I think his first words were “Dad Gum!”. Lol.
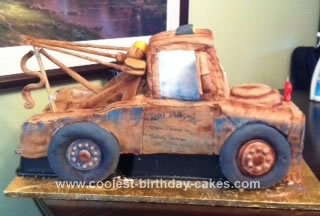
I started by making the towing system out of fondant mixed with gumpaste. I used dowel rods in the middle to keep them straight and just sculpted the hook and rope. I used orange fondant for his emergency light. I let those harden for a few days.
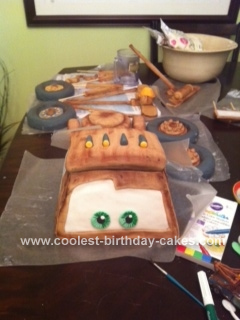
Next, I baked three large sheet cakes. I put them in the refrigerator to chill while I created the cab, wheels, and engine. I sculpted each out of rice crispy treats. In order to get the size I needed I had to use a large bag of rice crispies, four sticks of butter, and four bags of marshmallows.
Once I got the shapes I needed I coated everything in butter cream. I covered the butter cream on the cab and engine in brown fondant (except for the area where his windshield/eyes are). I covered the tires in black fondant with brown in the center. I used flattened pieces of fondant in the center of each wheel and then rolled small balls of fondant to look like lug nuts. I attached them using a small amount of water as glue.
Then, using a small flat paint brush, I applied brown luster dust to the cab, engine, towing system, and wheel centers to create a rust like look. I created the little details, like his roof lights, out of small pieces of fondant and attached them with water.
I used white fondant as his windshield. MAKE SURE TO PAINT THE LUSTER DUST ON BEFORE ATTACHING THE WINDSHIELD. If not, it will get on the white and make it look dirty. I then cut two quarter sized circles out of green fondant. I used edible markers to draw the pupils and irises on his eyes. I used a small ball of white fondant to create a reflection. I attached them to the windshield using a small amount of water.
I set all of this aside and retrieved the chilled sheet cakes from the fridge. I stacked the three cakes on top of each other using butter cream in between each layer. I sat the cake on two small black cake pans (9X13) to give the cake enough height for the wheels. I used dowel rods and pieces of cake to hold it up in the front and back (this was the most difficult part). Patience is priceless at this step.
Next, I carved out the bed and engine areas. I rounded off the sides of the front on each side of the engine compartment. I also carved out wheel wells so the tires would fit. I coated the whole thing in butter cream and put it back in the fridge to chill for an hour.
Once chilled, I applied brown fondant to the sculpted sheet cakes. I used five cut dowel rods as support where the cab would sit. I then painted on the rust with the brown luster dust and used two different colors of blue on the sides to give it that chipping paint effect. I used black fondant for the broken headlight. However, I put the broken headlight on the wrong side. It’s his left one. Oops. I used orange for the working headlight.
I then used a round tool to create an indent in the front for his mouth. I painted it with red luster dust and outlined it with an edible black marker. I used white for the teeth and applied them with water.
I wrote “Tow Mater”, “-Towing & Salvage-“, and “Radiator Springs” on each of his doors with edible marker.
Done!


Wow. A truly awesome cake. One of the coolest I’ve ever seen .
Your so talented cousin!! Great job!!
What a fabulous job you did, both with the cake and your description. Thank you SO much for sharing!
Thats amazing!! I have callled many local cake makers to make a Lightning McQueen cake for my kiddo but they all tell me due to copyright issues they cant, if they do then Disney could impose a 50,000 dollar fine….Heads up to you :)
my grandson is four yrs old he would just die if i brought home this cake,,he’s one of the biggest fan of cars….you did a great job there’s no other out there that compares to yours…
F A N T A S T I C !!!!!!!
Looks professional from here! I’m thinking you should submit this to the. Popular tv shown”Cake Boss” . U have set the bar high for next year’s birthday cake mom!