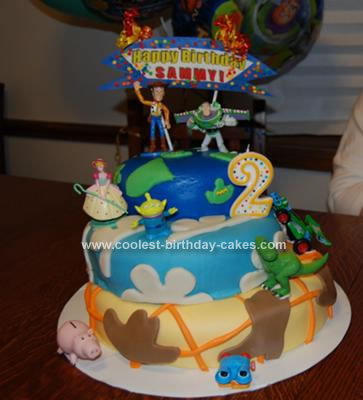
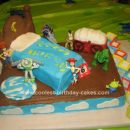
Woody and Buzz are my kids’ favorite characters, so of course we had to have a homemade Toy Story cake! This one was really fun and relatively easy with some help from two of my closest friends.
The bottom layer is “Woody’s shirt”, the middle layer is “Andy’s room” and the top is “Buzz” (outer space). Everything is home-made except the characters, which are small figurines which I purchased from the online Disney Store and the banner (made of paper).
For those fondant lovers out there (like me) I found an amazing alternative to the store bought variety! I used a recipe for marshmallow fondant which I found online. It was super easy to make, and easier to roll out and work with than the commercial / store brand. Plus it didn’t dry out quite as fast, and tastes WAY better!
Overall I thought it turned out really great, and I’m so proud of it! My son absolutely LOVED his homemade Toy Story Buzz Lightyear birthday cake!!!
Nice job! Did you use 2 of each sizes of cakes for your layers, or just one?
I think you did an awesome job on this cake! And you should be really proud of it!
Where was the fondant recipe found?
What color did you use for Woodys shirt? I am going to make this too!!! My son loves toy story and I am hoping to do this cake on my own if have you have any tips please share!
Try the Marshmallow fondant recipe. It is SOOOO easy and delicious!
I’m making a Toy Story cake for my son’s birthday. Where did you find the figures for the cake?
I hope to commit to this cake
How do I start from scratch?
thanks
I love this cake
Julie P from VA
Am I the ONLY person who HATES marshmallow fondant? I do not think it’s easy to make–very time consuming–and it’s NOT easy to roll out! The store bought fondant–much easier to use!
You can get the figurines from the Disney Store!
Looks great! I am making a similar sized cake for my son’s birthday party. I was wondering how many people this fed? also, did you do double or single layers for each tier?
THANK YOU for all your kind posts!! This was a really fun cake to make! Each of the three tiers are made of a two-layer cake, to give it the height. For Woody’s shirt I can’t remember the exact yellow color name, but it was NOT the bright lemon yellow. I think it was golden yellow, or something like that. The marshmallow fondant recipe can be found in lots of places online but I used the one on the Wilton web site and found it to be VERY easy to make and use. You MUST sift the powdered sugar, and if you move quickly you will be able to work the fondant while it is still a bit warm, which helps. I also used a LOT more shortening than it calls for, to lubricate my hands and the table surface while kneading out the fondant. I think it may have also helped with the pliability of the fondant. The flavor turned out great, my kids thought it was candy and gobbled it up! The figures I ordered from Disneystore(DOT)com for about $8, which isn’t bad, and my son was excited to get the toys after we cut the cake. Step by step?? Well, I bake the layers and freeze them while still hot. Next day, stack the layers to make each tier, and set aside. Prepare fondant (wait til now, because you must use it pretty quickly to prevent it drying out on you). Dirty ice the tier you’ve got fondant ready for, and then drape the fondant over. Decorate it up, then proceed with the next tier. (stack, make & roll out fondant, dirty ice, drape) Thanks again everyone!!
I did double layer cakes in each tier. It took (I think) four cake mixes to do it. We just had a small party with the family, so there was a LOT of leftover cake… I would guess it could feed up to 30 people, depending on how you slice it. I hope this helps, good luck with your cake, and to everyone else also!!
hello..your cake looks really nice. what cake did you used for all three layers and what sort fillings as well. Thank you.
Thank you! :) I did one tier in chocolate, one tier in vanilla, and the last tier was half and half (since there are two cakes layered per tier). We are not fans of filled cakes in our house, so I usually just spread a thin layer of buttercream icing in between the layers to make them stick. It works for us!
Where did you get the banner
I LOVE this cake idea! What size cake pans did you use for each tier??
I actually made the banner out of scrapbooking paper! I printed the text off the computer, trimmed it and glued it onto a blue banner shaped paper that I cut out of a sheet of scrapbooking paper. Then I glued little dots all around for looks, and taped two shish kebab sticks to the back so that they could be inserted into the cake and hold the banner up. Lastly, I shredded some giftwrapping ribbon and tied to the tops of the sticks. Viola!
What size pans did you use?
Hi i was wondering if you could write all the steps and recipe PLEASE..
First of all absolutely fantastic cake. Just want to know what dirty ice means and how do u stack the layers on each other is there anything or just by itself?
love some input
I would like to say bravo to the author and if I could I do have a recipe of cake
First off, I’m really sorry my replies come so much later than your comments. The email notification that more comments were made JUST came today, December 10th!
Second, THANK YOU for your great compliments!!! We loved this cake too, and I’m flattered you all like it!! :)
Now, to answer the latest questions: I can’t remember for sure which size pans I used, but they were either 6, 8, and 10, or they were 8, 10 and 12.
There’s a quick step-by-step in my reply posted on Aug. 21st. If you need more specific than that please feel free to ask for more! :)
For the cakes I always use Duncan Hines cake mixes because they seem to come out the most moist for me. For the “dirty ice” (which I’ll explain below) I either use Wilton’s Buttercream icing recipe (found here: wilton.com/recipe/Buttercream-Icing) or I just use store-bought icing found with the cake mixes. If you do that though, don’t get the “whipped” kind because it is too soft. And be sure to get a good brand for this. I’ve used generics that have RUINED my cakes. :( For the fondant I use Wilton’s recipe for Marshmallow fondant (found here: wilton.com/recipe/Rolled-Marshmallow-Fondant).
Dirty ice just means to slap a coat of icing on the cake to make the fondant stick to it. It doesn’t matter if it’s perfectly smooth and it doesn’t matter if it gets full of crumbs – “dirty” icing :) You want a nice layer coating the cake so the fondant will stick nicely all over, but not too thick or the fondant may slide.
For stacking the layers I just blobbed a bit of icing in between each, so they would stick in place. I SHOULD have used dowel rods and those thin plastic cake plate things to make it set nice and straight. If you look closely you can tell my cake is kind of slumping. :) I’m learning!! haha! Thanks again for the comments everybody! Happy decorating! :)
Just wondering how many batches of fondant you needed for this cake? Also, you said to use it while it’s still warm – Wilton says to store it overnight. Would you store it at room temp, or put it in the fridge? I think I have to make the fondant the day before so I don’t run the risk of running out of time on the big cake-assembling day!
my sons 3rd birthday is coming up and i really wanted to try to make his cake myself we usually spend about 65 dollars on a cake so i was wondering how much was it total for you to make this cake?
I hope my reply comes in time for your celebrations! I think it took two batches of fondant for this cake. I like to use mine warm because it’s so much easier to knead and roll out. I would store it at room temp. over night, but if you refrigerate it, you can easily warm it for a FEW seconds in the microwave to get it more supple again. I think in total I had about $20 in the cake, and that’s including the figurines! (Although I did not have to buy coloring or the banner supplies, since I already had those.)
Beautiful cake! Do you mind telling me the size of the figurines? Thanks!