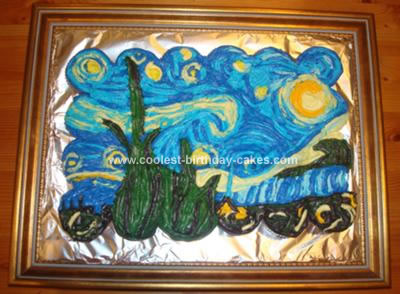
We baked 2 dozen cupcakes and placed then in 4 rows of 6 on a cake board covered in tin foil (but gold foil might have looked nicer) for this Van Goghs Starry Night Cake. We put little chocolate wafer cookies between the cupcakes so that the icing wouldn’t fall through the cracks between the cupcakes.
We made 2 recipes of icing (but…) and separated it into 7 or 8 different colors – 3 shades of blue (navy, sky & light blue), 3 shades of yellow (golden, sunny & very very light ), 2 shades of green (both very dark) and dark brown.
We started the design by outlining with a small tip: the trees, then the village at the bottom and each chunk of color above the village, then the swirls, stars and the moon. After everything was outlined we went through and added more thin lines of the different colors until the cakes was almost filled. For little touch-ups we used toothpicks to push the icing into gaps, or we took the icing and just added more color. The good thing about this cake is that you don’t need to worry about each color being exactly where it should – you can mess up (a lot!) and no one will ever know.
The last step was finding an older looking frame and putting the cake board in the opening (you should measure the cardboard so it fits the “picture” before you cover it and put the cupcakes on).
My Nana absolutely loved it and so did everyone else at the party. It was definitely a hit and we were happy we pulled it off so well!




Your comment has been sent successfully.