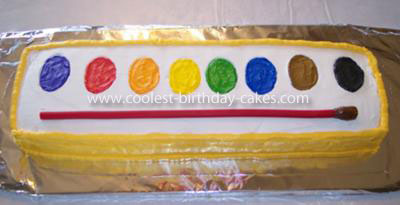
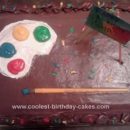
My son was a budding artist and loved to paint so I decided to make him this “Water Color Paint Set
” cake for his 4th birthday. With a few simple tricks it came out great! Everyone thought it was a pretty cool cake especially the birthday boy. We usually have large birthday gatherings at our house so I used a lot of cake. You can easily modify the size as you like by making the rectangle and the “paint color” ovals smaller or larger.
Here are the directions for how I made it:
Bake two cakes in 9×13 inch pans. Cut each cake in half along the 13″ side. Set one of the halves aside to use for extra servings if you like. Rotate each of the remaining 3 pieces 90 degrees and place them next to each other on a foil wrapped board making a long rectangle. Next, level the cake and trim the sides to make as close to a perfect rectangle as possible. The finished dimensions will be close to 6×24. To add a little height, cut the cakes to make 2 layers and add your favorite mousse between the layers as filling. I used strawberry mousse.
Frosting Prep:
Start with a large batch of butter cream frosting. Reserve enough white to crumb coat the entire cake and generously cover the top. For the “paint” ovals, tint 2-3 T. in 8 different colors. I used Wilton Icing Colors; “Christmas Red”, “Royal Blue”, “Black”, “Brown”, “Lemon Yellow”, “Kelly Green”, a combination of “Christmas Red” and “Royal Blue” for the purple, and a combination of “Lemon Yellow” and “Christmas Red” for the orange. For sides of the cake, I tinted the frosting using Wilton “Golden Yellow”.
Decorating the cake:
Start with a thin crumb coat over the entire cake. Then, frost the top of the cake with a generous layer of white butter cream. Frost the sides with the “Golden Yellow” color. Using a kitchen tablespoon or an oval cookie cutter, mark 8 evenly spaced ovals in a straight line along the bottom 2/3s of the top of the cake. It’s easiest to start with the two ovals on either side of the center line and work your way out. Carefully scoop out the frosting from the ovals. Fill each oval shaped indentation with one of the 8 different colors of frosting. Using a large circle tip, pipe a line along the outside edge of the top of the cake. This will cover the boundary between the white and gold colors. Using the same tip, pipe a line all the way around the bottom edge of the cake. To make the paintbrush, use a licorice rope for the handle and a mini Tootsie Roll for the bristles. Round one end of the “bristles” by rolling the Tootsie Roll on the counter. Use a paring knife to press some lines into the Tootsie Roll to add more texture to the “bristles”. Gently press the “brush” into the butter cream above the “paint” colors on the top of the cake.
This design leaves plenty of room along the sides of the “Paint Set” to write your “Happy Birthday!” or other party message. I hope you have fun with this one. We sure did!


Your comment has been sent successfully.