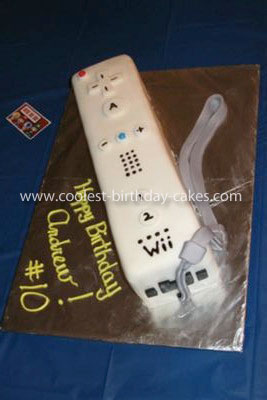
Like many children these days, my son is practically obsessed with video games. He wanted to have a Wii birthday party so I went about making a cake to match the theme. This Homemade Wii Cake was a HUGE hit with my son and his friends!
Here’s what you’ll need:
11×15 cake
Your choice of filling
White fondant
Black fondant
Gel icing pens in black, red, and blue
A Wiimote or pictures of one to use as a model
Here’s how I made it:
I used an 11×15 cake pan to bake the cake. (This pan takes 11 cups of batter so it makes a lot of cake.) Level the top of the cake. Cut it into two layers and add filling between the layers. Next, cut the cake in half along the 11 inch side making a long rectangle (5 ½ x 15). Spread some butter cream on the top of one of the halves then stack the other one on top. Secure the layers together with a few skewers if it seems unstable. Cover the whole cake in a thin layer of butter cream. Then cover it with a layer of white fondant.
Using a Wiimote as a model and guide for proportions, cut shapes out of the fondant. You can also download pictures of a Wiimote, enlarge them to the right proportions for your cake, and then cut them out to use as “stencils”:
From white fondant cut:
Circle, 1 large (A button), 2 medium (1&2 buttons), and 4 small (-, HOME, +, and power buttons).
Cross shape for directional control
From black fondant cut:
Block ?U? shape for the back
2 small squares for either side of the ?U?
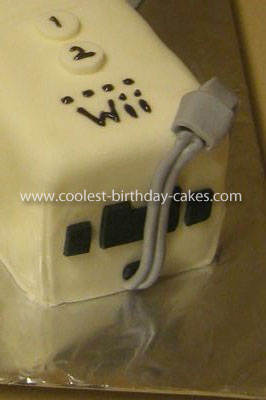
A small rectangle for where the strap attaches to the controller
The rounded rectangle shape for the front end of the controller
Brush a little water on the back of the shapes then stick them on the cake in the right spots. Use the gel icing markers to add the details.
The Strap, (I hadn’t originally intended to make the strap. I came up with it late in the process in order to cover a tear in the fondant in one of the corners of the cake. It turned out to be one of my favorite parts!)
Mix a small portion of the black fondant with the white to make a gray color. Roll out a long strip fondant – approx 30″. Cut 2 pieces off the end to make the strap fastener and the connector piece at the end of the strap. Each piece should be long enough to wrap around a “double stack” of the strap strip. Use a pizza cutter or a piece of screening, roll or press lines into the strap strip to give it some texture.
Roll a thin “snake” of gray about (approx 6″-10″ long) to make the piece which attaches the strap to the controller.
Gently fold the strap in half so that the textured side faces out. Wrap one of the cut pieces round the strap to make the adjuster. Fold the “snake” in half and gently join it to the place where the two ends of the folded strap meet. Wrap the second cut piece around the joining and seal it all together. Join the “snake” end of the strap to the bottom of the Wiimote. Place the strap however you like either on the cake or on the board. (Like I said, it can come in handy to cover any cracks or tears in the fondant).
It seems like there are a lot of directions here but I was surprised by how quickly this cake went together and how well it turned out. Enjoy!





This is awesome!