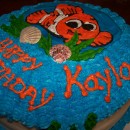
This Sponge Bob cake was made for my husband’s coworkers daughter and was my first attempt at making a cake I was being paid for! I used the Wilton color flow mix. By using color you can create a dimensional design for your cake. The ingredients are the Wilton mix, water and confectioners’ sugar. The complete directions are included with the mix. I usually mix one batch and that seems to be sufficient for the few cake I have decorated with color flow.
Prior to making your color flow you will need to choose the picture of your character or scene. I do this by using coloring books or print something from the internet. After that it is much like coloring on a piece of paper.
STEP 1 – Start this step about 4-5 days prior to needing the cake. Choose design, place paper on your working area (somewhere that it can stay to dry), tape wax paper over the image. You need to be able to see the outline of your image through the wax paper. Kind of like tracing when you were a kid. Decide the colors you will need to “color” your picture, divide color flow into bowls and color your icing. Color flow dries quickly so keep covered with damp paper towel. Fill pastry bag with color flow icing. Start by out lining the picture in the color of your choice.. After the outline dries a little start piping icing within the outlined area. Icing will flow to the edges. Continue until your picture is “colored”.
STEP 2 – Very important – LET DRY. These decorations are delicate. I have made my decoration up to a week in advance. Letting it dry is a hard step for me because I can’t wait to see the finished cake!
STEP 3 – Bake your desired flavor of cake and frost with Wilton butter cream frosting recipe. I crumb coat the cake first and then add my next layer of frosting. For a smooth cake let the icing set for about 30 minutes and then use a Viva paper towel to smooth the cake. You do this by gently placing the paper towel over the cake area by area and rubbing your hand over the top of it.
STEP 4 – Carefully lift your decoration from the wax paper and place on the cake. Finish with final border or writing on the cake.




Your comment has been sent successfully.