When I was a teenager I ran the only kosher bakery in town out of my mother’s kitchen. I decorated virtually the entire bar and bat mitzvah cakes for my synagogue. My signature cake was designed to look like an open book that sat on a larger sheet cake. The cake icing was entirely in buttercream.
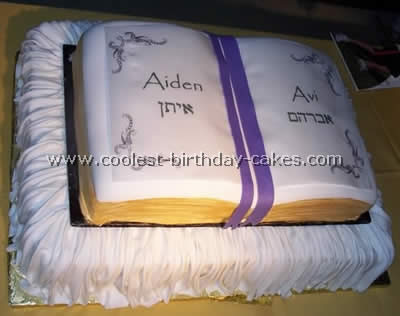
For my nephew Avi’s bar mitzvah I decided to use a similar design to the one I had done in the past but I kicked it up a notch with fondant. This is a pretty enormous cake, the biggest I’ve ever decorated. The base tier is a two-layer full sheet cake (18″ x 26″). The top tier “book” was carved out of a two-layer half sheet cake (12″ x 18″). I worked on the base tier first. After icing the cake with buttercream I created the “satin ruffle” look by rolling white fondant in a pasta maker starting with setting # 1 and working my way up to setting #5. If you try to skip settings the fondant will tear. The strips were about 9″ long, 4″ wide and the fondant was rolled very thin. I would straighten the edges of each strip with a ruler and a sharp knife and then I’d then loosely fold it in an accordion fold to create a pleated effect. Then I’d lightly drape the fondant strip over the side of the cake allowing it to fall in a natural-looking fashion. You can’t force it into shape; just let it fall. I’d then repeat the process with another strip laying it on the cake right next to the previous strip to make sure there weren’t any visible seams or spaces between the strips. It took about five and a half
hours to work my way around the entire base cake (i.e. this is a long slow process so if you are doing it on a big cake make sure you plan for enough time). Please note that the fondant ruffles need only cover the edges of the cake, not the top of the cake since there is another tier sitting on top. These fondant strips actually only continue for an inch or so under the “book.”
Once the edges of the cake were completely covered with fondant strips I airbrushed it with pearl dust to create a satiny shine. For the book tier I placed the cake on a board that was covered with black paper. If you are ambitious and have time you could cover the board with fondant or cake icing instead of paper. I then carved the top of the cake into the shape of an open book. This really isn’t difficult using a long serrated knife. I crumb-coated the cake in buttercream and then covered it with white fondant. Using a tool that looks like a very small pizza cutter I make impressions in the sides of the fondant to look like the edges of pages, making them curved in the front and back to follow the profile of the open book while using a ruler on either side of the cake to make the “pages” straight.
I then painted the sides of the book with gold luster-dust mixed with vodka to give the page-edges a gilded appearance. The book pages on the top of this cake were designed on a computer. This was a double bar mitzvah for my nephew Avi and his good friend Aiden. Their names were printed in English and Hebrew on rice paper using edible ink (you must have a dedicated printer that only uses edible ink – please don’t try this using your regular desktop inkjet!). I used this method because (a) my cake-handwriting is terrible (b) I wanted the flat flush look of a printed page and (c) I thought this had a clean masculine look that would be nice for teenage boys. Since most people do not have access to this equipment anyone doing this at home might opt for simply writing on the cake in buttercream and decorating it however you like (drop flowers brush embroidery etc.).
Lastly I cut two strips of purple fondant to look like bookmarks and sprayed them with pearl dust. I then lay them over the top of the cake and trimmed the edge in the back so that it was flush with the cake board. Because the fondant ruffles prevent the top tier from sitting completely flat on the top of the base tier I was afraid that the top tier might slide around during transportation. Therefore I did not assemble the two tiers until I had delivered the cake to the location of the party. After inserting support dowels in the base tier I just lay the book tier on top. The cake was a hit and I was really pleased with the results. Big thanks to Jennifer Bartos and all the folks at All in One Bake Shop who helped me with the cake icing.
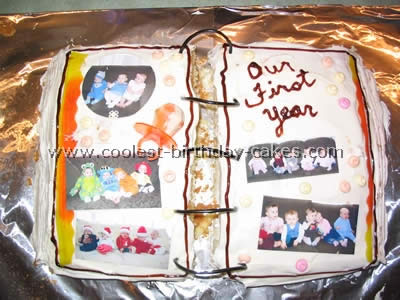
I made this cake for the first birthday of all the babies in our playgroup. The five of them were born within two months or so of each other and all of us moms are friends and avid scrap bookers.
I made a cake from a mix in a 9×13 pan and cut it in half. (I wish I had brushed the crumbs out of the way before continuing to decorate it!) It was hard to frost after it had been cut – I should have chilled or froze it before applying the cake icing.
I used licorice for binding the “book” together. I used fruit roll ups cut with craft scissors to border the pages and real wallet size pictures of the babies with wax paper underneath them. I used a candy necklace to get the little circles and a ring pop to look like a pacifier as my “page embellishments.” It was easy to make.
With more time and effort a more detailed or realistic “scrapbook page” could be made. Fondant would make nice smooth pages photo mats and embellishments. Fresh or silk flowers could decorate the pages or any actual scrapbook supplies like tags or ribbons could be used and removed prior to serving.
More Book Cakes
Cake by Ruth M., Sydney, Australia
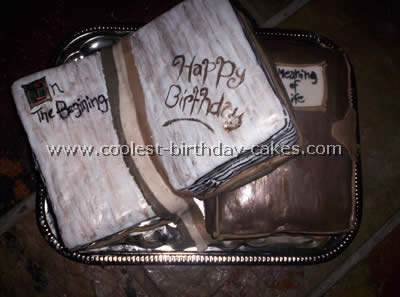
It was my Dads birthday. He was having a party and I was in charge of the cake. I wanted something personal and that suits him but couldn’t find anything so I thought about what he likes and came up with a book.
It is very simple, just three large rectangle cakes cut in half down the width of all three which gives you six rectangle cakes. I spread jam and cake icing on three of the cakes and lay one of the plain cakes on each jam cake. I did the book underneath first by just covering it in colored fondant and adding ‘book like’ embellishments out of left over fondant.
Next I did the flat side of the open book just by covering it in white fondant. I did the side of the open book on an angle (this part was a little difficult) laid it flat next to the complete book then covered it and embellished with colored fondant. I then made the book mark (which conveniently hid a little joining mess up)
Lastly I painted the page lines and the illuminated letter and the writing with food colorings and gold luster dust and lightly painted the entire cake with the gold luster dust and a small amount of cake decorating rose spirit (because that will evaporate) and that gave it a shivery appearance.


Your comment has been sent successfully.