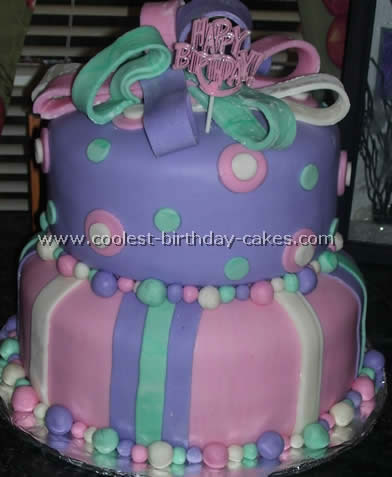
I got the idea for this happy birthday cake from a picture in a Wilton magazine. Inside is vanilla and chocolate cake. Outside I used marshmallow fondant. To make marshmallow fondant all you do is melt marshmallows and powdered sugar together. Grease the counter with Crisco and dump the mixture on to it. Knead until it’s easy to work with. Make sure you grease your hands before you knead it.
The colors I let my girls pick out since it was their birthday cake. This fondant is the only kind I will ever use from now on. It tastes great!
Cake submitted by:
Debbie S.
Edinburg, TX

I first made two 8×2″ square cakes. After cooling completely and freezing each for a couple of hours I then leveled them both off. I added a filling in the middle and iced them with a white buttercream icing. I rolled my fondant out to a 16″ circle and then covered the cake, smoothing it as I could to make the corners and bottom look neatly. I trimmed off the access fondant.
I then colored some fondant black and pink (however, you can purchase fondant that color if you do not want to take the time to do it yourself). I rolled the black out approximately 1/16″ thickness and made the black polka dots. Then I made my ribbon and bow with the pink fondant.
This was not hard to make and makes a beautiful happy birthday cake. Just take your time and let me know if you need any help. I will try and advise you if I can.
Cake submitted by:
Stephanie M.
Toronto

I used an 8″ square pan and baked a vanilla cake. Once it was cooled I leveled it and filled it. I then used a “crumb coat” and covered it with fondant. For the bow I cut out strips and used water as “glue” to stick them to the cake. For the bow I had two loops and used tissue paper in between them in order to keep them loop-y.
Once finished I used flower shaped cutouts and stuck them on the cake. Very easy, in no time I had a happy birthday cake, Tiffany’s Present box!
Happy Birthday cake submitted by:
Tamara E.
San Diego, CA

This is actually a happy birthday cake that I “copied” from one on this site! The cake I copied was exactly the same but pink for a little girl. I was very happy with the results and since it was a big party it was great to have a big cake!
I thought the person who submitted the little girl cake might be interested to know that someone else thought it was a great cake too. It was very easy but looked great. my daughter was extremely pleased!
Happy Birthday cake submitted by:
Jen D.
Lynnfield, MA

This happy birthday cake was for my niece’s first birthday. It is decorated with a fondant ribbon crown and white chocolate star lollipops. I made the fondant decorations a few days ahead to give them time to dry.
The cake is two 10′ layers with a 12′ layer on top. I put straws in the 10 layers and a cake board under the 12 inch for support. The cake is frosted with homemade buttercream.
Happy Birthday cake submitted by:
Andrea N.
Kent, OH

This is a 2 layer 8″x8″ cake covered with fondant. It’s really simple. And the bow and ribbon twirls are also made from fondant. I thought this would be a cute idea for a baby shower cake.

Happy Birthday cake submitted by:
Pam C.
Minden, LA

This happy birthday cake is by far the most popular type cakes I make for birthdays. I sent a couple of variations but all with the same technique and design. Not sure how this came about.
I was talking to a mom and she had brought a napkin or something in and I came up with the dots and adding a ribbon bow on top. As we were looking at it my 9 year old daughter Katie said it looked like two presents and I should put a tag on it. So then came the gift tag and that is where I write the greeting.
I baked 2 layers each of a 8″ square and 4″ square. TIP(If you don’t have a 4″ square like me I just bake cake in a regular bread loaf pan and cut it in half when ready to put together) I iced the 2 8″ cakes smooth then put the bottom layer 4″ caddy corner or sideways on top of the 8″ cake. Add frosting and put top layer on and ice butter cream.

I use fondant for the dots. I have the round fondant cutters. I use the middle one for these cakes. I have also made the dots and added the small dots on top in a different color just for something different. I have also used different shapes, hearts, and butterflies on these cakes. They are so popular. They are great for baby showers too.
Happy Birthday cake submitted by:
Kenny L.
Durham, NC

This is a happy birthday cake for my partner’s 50th birthday. I combined a bunch of different ideas for decorated box-like cakes. The cake is first covered in white fondant. Then I did the quilting pattern on the sides. After that I did the fondant “box top.” This I found to be not as simple as it would seem. I tried just cutting out a square piece of fondant and smoothing it on top but it didn’t hang at all evenly. I ended up cutting around the bottom edge of the box top with a pair of scissors to make the bottom edge as even as possible all the way around the cake.
I added the fondant ribbon which was painted with gold luster dust. Then I put on all the dragees with royal icing and a pair of tweezers. If I had a mold to make the pearl border out of fondant it would have gone a lot more quickly. As it was I spent over 2 hours gluing on the dragees.
I was happy with the end results of this happy birthday cake; it was all very well worth it.
Happy Birthday cake submitted by:
Carey F.
Langley, BC

My girlfriend was turning 30 and her husband was having a surprise party for her. I just recently started cake decorating and wanted to try using fondant icing. I had never done it before and was really pleased how it turned out. I often look on the internet to get ideas and that’s how I got the idea to do a present happy birthday cake out of fondant.
I chose colors I thought she would like and researched how to do the big bow on top. It took lots of tries but I finally got it how I wanted it. I cut strips of fondant and made loops. I let them dry overnight and put the bow together using water to make it stick together. I was pleasantly surprised at how easy it was to manipulate the fondant into the shape you want it and how smooth it turns out.
This happy birthday cake took a lot of preparation and thought. I added the color to the white fondant and kneaded it in until it was mixed thoroughly and it was the shade I wanted it. I rolled it out and carefully put it on top of the cake and smoothed it out with my hands and a fondant smoother. Then I added the ribbon strips and cutout circles with a little bit of water to make it stick. The bow just sat on top of the happy birthday cake so she could take it off easily before cutting.
It was a big hit at the party and I even impressed myself!

Happy Birthday cake submitted by:
Lisa L.
Calgary, Alberta

First prepare boards using 2 layers of stiff cardboard, cut to size, tape together, cover with wrapping paper (taping underneath board) then cover with clear contact paper. The day before you start making this happy birthday cake, do these following steps:
The #1 can be made with sugar cookie dough and iced with royal icing; I believe I attached mine to a popsicle stick with a wad of gumpaste or fondant, set aside to harden then push through top of cake when it is complete. While you have the royal icing out also make the bows for the presents. I do mine freehand with a #3 or #4 round tip and about 1 1/2″ long each. Be sure to make extras to allow for breakage (this will happen!).
The top cake is a 6″-round two layered cake. After stacking the cakes trim the top edges on an angle for a rounded effect. Crumb coat then ice with coloured buttercream icing until smooth. Refrigerate until firm.
In the meantime roll out fondant icing then use the 6″ pan as a rough template. Freehand cut about 3/4 ” away from the pan in a scallop design. Set this fondant piece on top of chilled cake and smooth out. Add remaining decorations such as middle border and lower border of your choice (I used a #2 round tip).
With royal icing secure a clear plastic cup to larger cake board. This will be the stand for the small round cake. I like to bake my cakes for the presents as thin slabs that will be about 1/2″ high when finished baking. I then stack them about 3 high with a thin amount of buttercream icing in between each layer. Freeze this stacked slab.
Remove from freezer and cut into 2″x2″ squares; working quickly (if you can!) crumb coat each and return to freezer. Be sure to separate them. I then individually ice each present while it is frozen (or well chilled). Baste with coloured buttercream, add designs, add a “ball” of buttercream to top center then arrange about 9 bow pieces. Carefully lift and set on cake board.
Be sure to have your round cake (or at least a board) sitting on the stand when you are arranging the presents so you are leaving enough room and not having the presents touching the board above. Have fun!
Quick fondant recipe (and a LOT cheaper than store bought): In a micro bowl heat 16 large marshmallows with 1 tbsp water for about 1 min. Stir until all marshmallows have melted. Start stirring in powdered icing sugar. When it becomes solid enough transfer it to a countertop dusted with icing sugar. Start kneading in more icing sugar until it is not sticky anymore. Leave to sit overnight in an airtight plastic bag.
Happy Birthday cake submitted by:
Karyn A.
Medford, OR

This happy birthday cake was made for my friend’s grandmother’s birthday. We made three 8X8 square cakes, frosted in between layers and around the cake once put together. We then used fondant to cover the cake. Grandma said that the happy birthday cake was too pretty to cut… It turned out great!
Happy Birthday cake submitted by:
Joyce B.
Oklahoma City, OK

I made this cake for my mother-in-laws Christmas office party. I used buttercream frosting and a raspberry filling. All of the gold accents are done by hand with decorators gold powder mixed with lemon extract.


Your comment has been sent successfully.